泰斗学习
站点博客

Quality Door Repairs: Ensuring Security and Aesthetic Appeal
Doors are more than simply an entry or exit point to a structure; they are gateways that improve security, offer privacy, and contribute significantly to the general visual appeal of a residential or commercial property. Over time, wear and tear can take a toll on doors, necessitating repairs. Quality door repairs are crucial not just for preserving the performance of the door but likewise for making sure that the safety and visual value of the home stay intact. This short article will explore the importance of quality door repairs, common problems that need attention, and crucial considerations for property owners and residential or commercial property supervisors.
Significance of Quality Door Repairs
Security Enhancement: A damaged door can compromise the security of a property. Cracks, broken locks, or distorted frames can offer easy access for trespassers. Quality repairs attend to these vulnerabilities, enhancing the security of the properties.
Visual Values: Doors contribute considerably to the interior and exterior appeal of a building. Even a small scratch or dent can interfere with a door's appearance. Fixing these flaws not just brings back charm but can likewise improve the general appearance of the home.
Energy Efficiency: Doors that do not close appropriately can lead to drafts, increasing energy expenses. Correctly examined and fixed doors guarantee better insulation, causing enhanced energy performance.
Home Value: Well-maintained doors add to the overall value of a home. Quality repairs can be viewed as an investment that pays off when it comes time to offer.
Common Door Issues Requiring Repair
1. Contorting
Wooden doors can warp due to changes in humidity and temperature. A warped door might not fit properly in its frame, leading to gaps that can impact security and insulation.
2. Damaged Locks and Hardware
Locks can end up being worn or damaged over time, making them less reliable. Sticking knobs or locks can likewise posture an issue, impacting the ability to open or close the door efficiently.
3. Damages, Scratches, and Paint Peeling
Daily use can lead to unattractive damages and scratches. Furthermore, doors may experience peeling paint, which not only looks undesirable however can also expose the door to moisture damage if left neglected.
4. Hinge Issues
Hinges are vital components that enable a door to swing open and shut. If they are rusty or damaged, the door can hang improperly, resulting in more structural problems.
5. Glass Damage
For doors with glass panels, chips, fractures, or breaches can position major security and security concerns. Repairing or replacing the glass immediately is important to keep the integrity of the door.
Actions to Quality Door Repairs
When faced with door repair needs, consider the following actions to make sure quality outcomes:
Assessment: Carefully examine the door and surrounding area for any signs of damage. Determine whether the repair required is small, like touch-up painting, or significant, such as replacing locks or hinges.
Choose Quality Materials: When fixing or replacing parts, select products that are long lasting and proper for the door type.
Employ Professionals: For considerable repairs, it's recommended to engage a reliable specialist with experience in door repairs. Experts can make sure that the work is done properly and complies with safety standards.
Routine Maintenance: Prevent future repairs by regularly keeping doors. This consists of cleansing, oiling hinges, and looking for indications of damage. Early detection can conserve property owners money and time.
Consider Upgrades: If a door is constantly problematic, it may be worth considering an upgrade instead of duplicated repairs. Modern doors use better security, insulation, and visual appeals.
Frequently Asked Questions About Quality Door Repairs
Q1: How often should I examine my doors for prospective repairs?
It's an excellent practice to conduct an examination of your doors a minimum of two times a year. In addition, check them after severe weather condition occasions or any major home remodellings.
Q2: Can I repair a distorted door myself?
While small changes can in some cases be made at home, severe warping usually requires professional evaluation. In many cases, experts might suggest replacing the door outright.
Q3: What products are best for repair?
The very best products depend on the door type. For wooden doors, use high-quality wood filler or layer a brand-new sheet of wood. For metal doors, select rust-resistant products.
Q4: What should I do if my door lock is sticking?
Initially, figure out if excess paint is the cause; if so, carefully remove it. If sticking continues, consider lubing the lock or changing it if it's old or damaged.
Q5: How can I improve the energy effectiveness of an old door?
Ensure the composite door Repair service has appropriate weather removing and caulking to avoid air leakages. Furthermore, upgrading to a door with better insulation homes can significantly boost energy effectiveness.
Quality door repairs play a significant role in keeping the performance, appearance, and security of a residential or commercial property. By being proactive in recognizing prospective issues and using the right strategies or professionals for repairs, homeowner can guarantee their doors remain in optimal condition. Routine maintenance, prompt action for repairs, and consideration of upgrades when required contribute to the longevity and toughness of this crucial function of any structure.
By buying quality door repairs, property owners not just protect their property however likewise enhance its worth, visual appeal, and energy effectiveness-- an investment that pays off in various ways.
The Ultimate Guide to Buying Fireplaces Online: What You Need to Know
Over the last few years, the pattern of buying home appliances and ornamental items online has actually surged, reflecting a significant shift in consumer behavior. One such item acquiring appeal in the online marketplace is the fireplace. Whether for visual appeal, ambiance, or usefulness, a fireplace can transform a home. This article aims to supply a thorough guide to buying fireplaces online, highlighting the numerous types available, essential considerations, and pointers to ensure an effective purchase.
Kinds Of Fireplaces Available Online
When exploring alternatives for fireplaces, it's vital to understand the various types readily available. Each type provides distinct functions and advantages, accommodating different preferences and home designs. Below is a concise table outlining the significant categories:
| Fireplace Type | Description | Pros | Cons |
|---|---|---|---|
| Wood-Burning Fireplaces | Traditional choice that utilizes logs for fuel. | Genuine experience, high heat output. | Needs venting, routine maintenance. |
| Gas Fireplaces | Run utilizing natural gas or propane, often with instant ignition. | Hassle-free, cleaner options. | May require a gas line installation. |
| Electric Fireplaces | Plug-in units that supply heat without real flames. | Easy to set up, no venting required. | Limited heat output compared to gas/wood. |
| Gel Fireplaces | Make use of gel fuel containers for an attractive flame. | Portable, no venting or Top Rated Stoves difficult installation. | Limited burn time, less heat output. |
| Ethanol Fireplaces | Use bio-ethanol fuel, supplying a clean flame. | Environmentally friendly, flexible design alternatives. | Can be pricey to keep. |
Secret Considerations When Buying Fireplaces Online
Shopping for a fireplace online can be challenging due to the huge selection and the significance of picking the ideal design for your home. Here are some vital elements to consider:
1. Size and Space
- Step Your Space: Ensure the fireplace fits well in your preferred location. Consider not just the width and height however likewise how it will impact your room's total style.
- Heat Output: Different kinds of fireplaces produce differing quantities of heat. Make sure that the design you pick can effectively heat up the area you are considering.
2. Fuel Type
- Select the type of fuel that best fits your lifestyle. Wood-burning fireplaces provide a genuine experience, while electric models supply ease of usage.
3. Style and Aesthetic
- Your fireplace must complement the design of your home, whether modern, traditional, or rustic. Consider the design, products, and additional features like mantles or log storage.
4. Setup Requirements
- Some fireplaces require complex setup. Inspect whether you will need expert aid or if a DIY setup is practical. Gas fireplaces, for example, might need a licensed technician for setup.
5. Regulations and Safety Standards
- Guarantee that the fireplace meets local building regulations and security requirements. This is especially important for wood-burning and gas models, which may need authorizations.
6. Reviews and Ratings
- Constantly check consumer reviews and rankings before purchasing. These can provide insights into the reliability and efficiency of a specific model.
Advantages and disadvantages of Buying Fireplaces Online
While buying a fireplace online provides benefit, it also has its obstacles. Here's a glance at the benefits and drawbacks:
Pros:
- Wide Selection: Access to various brands and designs that may not be offered locally.
- Competitive Pricing: Online sellers frequently provide better deals compared to traditional shops.
- Convenience: Shop from the comfort of home without the inconvenience of going to multiple shops.
Cons:
- Inability to See Product: You can not inspect the fireplace physically before buying.
- Delivering Issues: Delivery times might vary, and there's the risk of damage during shipping.
- Difficult Returns: Some online retailers have actually made complex return policies, making it challenging if the product doesn't meet expectations.
Tips for a Successful Online Fireplace Purchase
To guarantee a smooth transaction and satisfaction with your fireplace purchase, consider the following tips:
- Do Your Research: Read up on fireplace types, patterns, and brand name track records.
- Compare Prices: Use comparison websites to guarantee you get the very best deal.
- Check Shipping Policies: Understand the shipping costs and policies regarding damages or returns.
- Customer Support: Ensure that the merchant uses dependable customer assistance for any pre-purchase concerns.
- Guarantee and Insurance: Consider items that include warranties and inspect if they have insurance for shipping damage.
Often Asked Questions (FAQs)
Q1: Can I set up a fireplace myself?
A1: Some fireplaces, particularly electric and gel designs, can be set up by house owners. However, gas and wood-burning fireplaces frequently need professional installation to abide by safety requirements.
Q2: Are electric fireplaces energy-efficient?
A2: Yes, electric fireplaces are normally more energy-efficient than traditional wood-burning choices, as they convert almost all the electrical energy they take in into heat.
Q3: Do I require a chimney for a gas fireplace?
A3: Traditional gas fireplaces may need venting, however some styles, like ventless gas fireplaces, do not need a chimney.
Q4: How do I keep my fireplace?
A4: Regular upkeep varies by type. Wood-burning fireplaces require chimney cleaning, while gas and electric designs need to be inspected regularly to ensure safe operation.
Purchasing a fireplace online uses lots of benefits, from benefit to a massive selection. However, it's vital to understand what you're looking for and consider various elements before purchasing. By understanding the available types, evaluating your requirements, and following the tips provided, buyers can make an educated choice that improves their home while offering heat and atmosphere for several years to come.

Restoring Smooth Operation: A Comprehensive Guide to Repairing Your Bifold Door Top Pivot
Bifold doors, also referred to as folding doors, are a popular choice for optimizing area and creating a seamless shift in between rooms or in between indoor and outside living locations. Their special folding mechanism enables broader openings than conventional hinged doors, making them perfect for closets, kitchens, laundry spaces, and even as patio doors. However, the smooth and effective operation of a Bifold Door Pivot Repair door depends upon a number of crucial elements, and one of the most vital, yet often ignored, is the top pivot.
The leading pivot is a little but crucial mechanism that sits at the leading corner of a bifold door panel, allowing it to rotate smoothly within the track system. In time, due to wear and tear, incorrect alignment, or perhaps unexpected damage, this pivot can fail. A malfunctioning top pivot can cause a host of aggravating concerns, from sticking doors and noisy operation to complete immobility. Thankfully, repairing or changing a bifold door leading pivot is often a manageable DIY task, conserving you the cost of expert repairs and restoring the functionality of your door.
This detailed guide will stroll you through the process of understanding, diagnosing, and fixing a bifold door top pivot. We will explore the elements involved, recognize common issues, equip you with the necessary tools and products, and supply a step-by-step repair procedure. Whether you are a skilled DIY enthusiast or a homeowner taking on home repairs for the very first time, this post will empower you to confidently resolve a defective bifold door top pivot and get your door operating smoothly when again.
Understanding the Top Pivot System
Before diving into the repair process, it's useful to understand the role of the leading pivot within the more comprehensive bifold door system. The leading pivot, in combination with the bottom pivot (typically described as a guide or wheel), works to control the motion and stability of each door panel.
Generally, a bifold door system consists of:
- Top Track: A metal track installed horizontally at the top of the door opening. This track houses the top pivots and guides the door panel's motion.
- Bottom Track or Guide: Some bifold door systems use a bottom track, while others use a bottom guide that is either a pin or a wheel, engaging with a groove or channel on the floor or door jamb. This bottom part assists support the door panel and maintains positioning.
- Leading Pivots: These are small, normally plastic or metal elements that are placed into the leading edge of the door panel and trip within the top track. They permit the door panel to pivot and slide smoothly along the track.
- Linking Hinges: Hinges that connect the individual door panels together, enabling them to fold in a concertina style.
- Door Handles and Hardware: Hardware utilized for operating and securing the bifold door.
The leading pivot bears a substantial load, assisting in the smooth sliding and folding action of the door. It needs to be robust enough to endure consistent usage, yet precise enough to permit for simple and easy movement. Comprehending its function assists in valuing why its appropriate function is so crucial to the overall operation of the bifold door.
Identifying Common Top Pivot Problems
Recognizing the symptoms of a failing top pivot is the first step towards a successful repair. Here are some typical signs that suggest an issue with your bifold door's top pivot:
- Sticking or Jerky Door Movement: The door ends up being hard to open or close efficiently, thinking twice or capturing as it moves along the track. This is often the most visible symptom.
- Noisy Operation: You might hear grinding, squeaking, or clicking sounds as the door is operated, indicating friction or damage within the pivot mechanism or track.
- Door Panel Drooping or Sagging: If the leading pivot is used or broken, the door panel may droop somewhat at the top, causing misalignment and additional hindering smooth operation.
- Visible Damage to the Pivot: Upon inspection, you may be able to see fractures, chips, or breaks in the plastic or metal components of the top pivot itself.
- Door Jumping Out of the Track: In severe cases of pivot failure, the door panel might leap out of the top track entirely, becoming completely inoperable and possibly damaging the door or frame.
- Increased Effort to Operate: If you discover yourself having to exert more force than normal to open or close the door, it could be a sign of increased friction due to a stopping working pivot.
If you observe any of these signs, it is extremely likely that your bifold door's leading pivot requires attention. Disregarding these problems can result in more damage to the door, track, or surrounding frame, making the repair more intricate and expensive in the long run.
Tools and Materials You'll Need
Before you begin the repair, gather the essential tools and materials to make sure a smooth and effective process. Having whatever prepared ahead of time will save you time and frustration.
Tools:
- Screwdriver Set: A Phillips head and flathead screwdriver will be vital for getting rid of and installing screws related to the pivot and door hardware. Ensure you have different sizes to fit different screws.
- Pliers: Pliers can be valuable for grasping and maneuvering small parts, especially if the old pivot is stuck or tough to remove.
- Hammer (Optional): A light-weight hammer may be needed to carefully tap the new pivot into place, if needed by the style.
- Determining Tape: To make sure precise placement and positioning when setting up the brand-new pivot.
- Pencil or Marker: For marking positions and ensuring right positioning.
- Shatterproof glass: Protecting your eyes is vital when working with tools and hardware.
- Gloves (Optional): To safeguard your hands and supply much better grip.
Materials:
- Replacement Top Pivot: This is the most important product. It's important to buy a replacement pivot that works with your specific bifold door system. Take the old pivot with you to the hardware store for contrast, or take down the door producer and design if possible. Leading pivots been available in numerous sizes and styles.
- Lubricant (Silicone Spray or Dry Graphite): Lubricating the track and new pivot will ensure smooth, peaceful operation and prolong the life of the pivot.
- Wood Filler or Wood Glue (Optional): If the screw holes holding the pivot in location are removed or harmed, wood filler or glue may be needed to enhance them.
- New Screws (Optional): If the existing screws are damaged or stripped, have a set of replacement screws of the proper size and type on hand.
Step-by-Step Guide to Repairing the Top Pivot
With your tools and materials ready, you can now continue with the repair. Follow these step-by-step guidelines carefully:
Step 1: Safety and Preparation
- Place on your security glasses.
- Guarantee the workspace is clear and well-lit.
- Gather all your tools and materials and put them within easy reach.
Action 2: Inspect and Access the Top Pivot
- Thoroughly take a look at the leading pivot of the problematic door panel to visually assess the damage. Look for cracks, breaks, or indications of wear.
- Identify how the pivot is connected to the door. The majority of are usually held in place by screws.
- You might require to a little open or close the bifold door to gain much better access to the top pivot.
Action 3: Remove the Old Top Pivot
- Utilizing the suitable screwdriver (generally Phillips head), thoroughly eliminate the screws securing the leading pivot to the door panel.
- If the screws are removed or tough to eliminate, you may require to use pliers to grip the screw head and gently turn it. Avoid damaging the surrounding door material.
- When the screws are eliminated, gently pull out the old leading pivot. If it's stuck, utilize pliers to carefully wiggle and pull it complimentary.
Step 4: Prepare for the New Pivot (If Necessary)
- Inspect Screw Holes: Examine the screw holes in the door where the pivot was connected. If they are stripped or enlarged, you may need to enhance them.
- For Minor Stripping: Apply a small amount of wood glue into the screw hole and let it partially dry for a few minutes. This will provide the screws a much better grip.
- For Severely Stripped Holes: Use wood filler to fill the removed holes entirely. Allow the filler to dry and harden according to the item instructions. When dry, pre-drill pilot holes somewhat smaller than the brand-new screws to ensure a protected attachment.
Step 5: Install the New Top Pivot
- Position the new leading pivot in the exact same orientation as the old one was removed.
- Line up the screw holes of the brand-new pivot with the holes in the door panel.
- Place the screws and tighten them safely with the screwdriver. Prevent overtightening, which might strip the screw holes or damage the pivot. Guarantee the pivot is strongly attached however not exceedingly tight.
Step 6: Lubricate the Track and Pivot
- Use a percentage of silicone spray or dry graphite lubricant to the top track of the bifold door, focusing on the location where the top pivot will run.
- Likewise, lightly oil the moving parts of the brand-new leading pivot itself. This will promote smooth operation and minimize friction.
Step 7: Test and Adjust
- Carefully run the bifold door, opening and closing it numerous times.
- Check for smooth, quiet motion. If the door still sticks or binds, re-inspect the pivot for correct setup and alignment.
- Ensure the door panels fold and unfold correctly and that the door is not rubbing versus the frame or track.
- If needed, minor modifications to the pivot position or track positioning may be required. Consult your bifold door producer's directions for specific change treatments if provided.
Step 8: Clean Up
- Once you are pleased with the door's operation, clean up your work location and put away your tools.
Fixing Common Issues
While fixing a leading pivot is often uncomplicated, you may encounter some difficulties. Here are a few troubleshooting pointers:
- Pivot Doesn't Fit: If the new pivot doesn't fit into the track or door, double-check that you have the right replacement type. Compare it carefully to the old pivot and the door specifications.
- Screws Won't Tighten: Stripped screw holes are a common concern. Refer back to Step 4 and utilize wood filler or glue to enhance the holes before attempting to tighten the screws again.
- Door Still Sticks After Pivot Replacement: If the door still doesn't run efficiently after changing the pivot, the issue might lie in other places. Inspect the bottom pivot/guide, the track for debris or damage, or the door panel hinges for tightness.
- Door Panel Misalignment: If the door panels are not aligned properly after repair, guarantee the top pivot is effectively seated in the track and that the door panel is correctly placed within the frame. Examine for any warping or damage to the door panel itself.
Preserving Your Bifold Door Pivots
Preventative upkeep can substantially prolong the life-span of your bifold door pivots and lessen the requirement for frequent repairs. Here are some handy upkeep tips:
- Regular Lubrication: Lubricate the leading track and rotates with silicone spray or dry graphite every couple of months to decrease friction and wear.
- Keep Tracks Clean: Periodically tidy the top and bottom tracks to get rid of dust, dirt, and debris that can hamper smooth operation. Utilize a vacuum cleaner or a brush to clean up the tracks.
- Examine Regularly: Inspect the top and bottom pivots regularly for signs of wear, damage, or looseness. Resolve any small concerns promptly before they escalate.
- Avoid Slamming: Avoid slamming the bifold doors, as this can put unnecessary tension on the pivots and hardware, leading to early failure.
- Inspect Alignment: Periodically inspect the positioning of the door panels to guarantee they are folding and unfolding properly and that there is no unnecessary tension on the pivots.
When to Call a Professional
While DIY repair is frequently possible, there are situations where looking for professional aid is suggested. Consider calling a door repair specialist if:

- You are uneasy with DIY repairs.
- The damage to the door or frame is comprehensive beyond simply the pivot.
- You are not able to recognize the proper replacement pivot.
- You encounter relentless concerns after attempting the repair.
- The bifold door belongs to a complicated system, such as a multi-panel patio door, and requires specialized knowledge.
A professional door technician has the experience and expertise to precisely identify intricate bifold door problems and perform repairs effectively and effectively.
Repairing a bifold door top pivot is a fulfilling DIY project that can bring back the smooth and simple and easy operation of your door. By understanding the parts, recognizing the problem, and following the detailed guide described in this short article, you can with confidence tackle this repair and conserve yourself money and time. Routine maintenance and prompt attention to small concerns will ensure the durability and trustworthy performance of your bifold doors for years to come, contributing to the comfort and functionality of your home.
Frequently Asked Questions (FAQs) about Bifold Door Top Pivot Repair
Q1: How do I understand what kind of leading pivot to purchase as a replacement?
A: The finest way is to get rid of the old pivot and take it with you to a hardware store. Compare it aesthetically to the offered alternatives, taking notice of the size, shape, and attachment approach. Alternatively, if you understand the producer and model of your bifold door, you might be able to find particular replacement parts online or through the producer.
Q2: Can I repair a damaged leading pivot, or do I always require to replace it?
A: In many cases, it's more practical and trustworthy to replace a broken or used top pivot instead of attempting to repair it. Pivots are fairly inexpensive, and replacement makes sure proper function and longevity. Trying to repair a damaged pivot might cause more problems and is usually not recommended.
Q3: My screws are stripped and will not hold the brand-new pivot. What can I do?
A: Stripped screw holes prevail. Attempt using somewhat longer or thicker screws. If that doesn't work, apply wood glue into the screw hole and let it partly dry before re-screwing. For badly removed holes, use wood filler to fill them entirely, let it dry, and then pre-drill pilot holes for the new screws.
Q4: Do I require to remove the whole bifold door to replace the top pivot?
A: Often, you can replace the leading pivot without completely eliminating the door panel. However, depending on the style and ease of access, it may be easier to partially remove the door panel to acquire better gain access to. In many cases, especially with much heavier doors or complicated systems, getting rid of the door panel might be safer and easier.
Q5: After changing the top pivot, my door is still hard to open. What else could be wrong?
A: If the issue continues after pivot replacement, examine other prospective problems:
- Bottom pivot/guide: Inspect for damage or debris.
- Track: Clean and lube the leading and bottom tracks. Look for damage or obstructions.
- Hinges: Ensure the door panel hinges are not stiff or binding. Lube them if needed.
- Door Alignment: Check if the door panels are correctly aligned within the frame.
Q6: How typically should I lube my bifold door rotates?
A: Regular lubrication every 3-6 months is suggested for optimum performance. More frequent lubrication might be required in dirty or high-use environments. Usage silicone spray or dry graphite lubricant to keep the pivots and track moving smoothly.
Preventing conservatory Maintenance Leaks: A Comprehensive Guide
A conservatory can be a stunning addition to any home, offering a space for relaxation, gardening, or entertainment. However, one of the most common and discouraging issues that conservatory owners deal with is leaks. Water intrusion can result in considerable damage, affecting both the structure and the contents of the conservatory. By comprehending the causes of leaks and carrying out preventive measures, house owners can safeguard their investments and enjoy their conservatories to the maximum.
Comprehending the Causes of Conservatory Leaks
Before diving into prevention methods, it is important to comprehend the common causes of leaks in conservatories. Recognizing prospective issues can assist property owners take proactive actions to protect their structures.
Poor Installation: One of the leading causes of conservatory leaks is poor setup. If the conservatory was not erected according to industry requirements, it might be more susceptible to leaks.
Damaged Roof Panels: Roof panels can break or end up being dislodged due to weather extremes, tree particles, or general wear and tear, causing potential leaks.
Guttering and Drainage Issues: Clogged rain gutters or poorly created drain systems can trigger water to pool around the conservatory, increasing the threat of leaks.
Aging Seals: Over time, the seals around windows, doors, and roof panels can deteriorate, producing gaps where water can go into.
Structural Movement: As buildings settle over time, structural motion can affect the conservatory's stability, resulting in gaps or misalignment that can lead to leaks.
Preventive Measures to Avoid Leaks
Taking proactive actions to prevent leaks can save property owners significant time, cash, and stress. Here are a number of methods to minimize the danger of leaks in conservatories:
1. Routine Inspections
Conduct regular inspections of your conservatory to recognize prospective issues early. Examine the following locations:
- Roof Panels: Look for any fractures, chips, or signs of dislodgement.
- Seals and Joinery: Check the condition of seals around windows and doors; replace any that appear worn or broken.
- Guttering and Drainage: Ensure that gutters are clear which water is flowing far from the conservatory.
2. Keep Your Guttering and Drainage
Correct maintenance of guttering and drainage systems can avoid water pooling and subsequent leaks. Follow these actions:
- Regular Cleaning: Clear leaves and debris from rain gutters a minimum of two times a year, ideally in spring and fall.
- Examine for Blockages: Ensure that downpipes are free from blockages, enabling water to stream easily.
- Install Gutter Guards: Consider installing rain gutter guards to decrease debris build-up.
3. Buy Quality Materials
When structure or renovating your conservatory, buy premium products. This includes:
- Durable Roof Panels: Choose thicker, impact-resistant roof panels that can hold up against extreme climate condition.
- Superior Sealants: Use top quality sealants that are created for outdoor use, guaranteeing they can hold up against temperature level changes and moisture direct exposure.
4. Address Structural Issues Promptly
If any structural motion happens, do not postpone in resolving it. Think about the following actions:
- Consult Professionals: Hire a qualified home builder or structural engineer to assess the situation and make essential repairs.
- Reinforce Weak Areas: Consider strengthening weak areas of the conservatory's structure to prevent more movement.
5. Select Professional Installation
When constructing a brand-new conservatory or changing an existing one, always choose for professional setup. To make sure quality:
- Research Contractors: Look for specialists with positive reviews, recommendations, and a respectable portfolio.
- Demand References: Speak to previous clients to understand their experience with the professional.
Additional Tips for Conservatory Maintenance
Apart from preventative procedures to prevent leaks, consider the following general maintenance tips to lengthen the life of your conservatory:
- Regular Cleaning: Keep glass surface areas tidy to allow max sunlight in, and frequently clean down surface areas to prevent mold growth.
- Temperature level Control: Use window movies or blinds to manage heat and avoid growth and contraction of seals with temperature level changes.
- Use Dehumidifiers: In damp environments, consider installing a dehumidifier to reduce moisture levels that may result in mold and mildew.
Frequently Asked Questions (FAQs)
Q1: How can I tell if my conservatory has a leak?A: Warning signs of a leak consist of water discolorations on the walls or ceiling, moisture on the floor, an increase in the development of mold or mildew, and a musty smell. Q2: Can I fix a leaking conservatory myself?A: Smallissues, like sealing fractures or cleaning gutters, can frequently be managed by homeowners. However, significant leaks or structural issues are best left to specialists. Q3: How typically ought to I check my conservatory for leaks?A: It is recommended to check your conservatory a minimum of twice a year, preferably before and after the winter season when weather condition extremes
can typically cause problems. Q4: What must I do if I find a leak?A: First, determine the source of the leak. If it's a minor problem, you may resolve it yourself. However, for considerable leaks, it is wise
to contact a professional for an assessment
and repair. Preventing conservatory leaks is essential for keeping a comfy and visually enticing space. By understanding the common causes of leaks and implementing the advised preventive measures, homeowners can
considerably decrease the risk of water intrusion. Routine evaluations, quality products, professional setup, and prompt attention to maintenance are essential steps in protecting the stability of any conservatory. Ultimately, with a bit of proactive care, property owners can enjoy their conservatories for years to come, devoid of the worry of leaks and damage.
The Importance of Replacement Bifold Door Seals: A Comprehensive Guide
Bifold doors have actually become a staple in modern-day homes and offices, offering a smooth and space-saving solution for dividing rooms or linking outdoor and indoor home. Among the important parts of a bifold door is the seal, which plays an important function in preserving the door's performance, energy effectiveness, and total lifespan. Over time, bifold door seals can break, compromising the door's performance and needing replacement. In this short article, we will explore the world of replacement bifold door seals, exploring their significance, types, installation procedure, and advantages.
What are Bifold Door Seals?
Bifold door seals are the rubber or vinyl strips attached to the edges of bifold doors, created to develop a tight seal between the door panels and the frame. These seals serve numerous functions:
- Weatherproofing: They avoid air, water, and moisture from entering or getting away the room, minimizing the risk of water damage, drafts, and heat loss.
- Energy efficiency: By producing a tight seal, bifold door seals assist to reduce heat transfer, keeping your home or office warm in the winter and cool in the summertime.
- Sound decrease: Seals can also function as acoustic barriers, lowering sound pollution and producing a more tranquil environment.
- Pest control: They avoid pests and small animals from going into the space, minimizing the risk of infestations.
Types of Replacement Bifold Door Seals
There are a number of types of replacement bifold door seals offered, each designed for specific door types and applications:
- Foam tape seals: These are the most typical kind of seal, made from foam tape connected to the door edges.
- Vinyl bulb seals: These seals include a vinyl bulb that compresses to create a tight seal.
- Magnetic seals: These seals use a magnetic strip to connect to the door frame, developing a strong seal.
- Adhesive-backed seals: These seals have a self-adhesive support, making them simple to install.
When to Replace Bifold Door Seals?
Bifold door seals can last for numerous years, but they might require to be replaced if:
- You discover air leakages: If you feel drafts or discover air leaks around the door, it's likely that the seal is compromised.
- Water enters the room: If water goes into the room during heavy rain or flooding, the seal may be damaged or used out.
- The door ends up being difficult to operate: If the door ends up being stiff or hard to open and close, it may be due to a worn-out seal.
- You observe indications of wear and tear: If the seal is split, torn, or breakable, it's time to replace it.
How to Install Replacement Bifold Door Seals
Setting up replacement bifold door seals is a relatively straightforward procedure:

- Clean the door edges: Remove any dirt, gunk, or old adhesive from the door edges.
- Measure the door: Measure the door to identify the proper seal size.
- Cut the seal: Cut the seal to the needed length using an energy knife or scissors.
- Apply the seal: Apply the seal to the door edges, guaranteeing a tight fit.
Benefits of Replacement Bifold Door Seals
Changing bifold door seals uses several advantages, consisting of:

- Improved energy effectiveness: New seals aid to reduce heat transfer, reducing energy costs.
- Increased comfort: By preventing air leaks and wetness entry, brand-new seals develop a more comfy living or working environment.
- Lowered upkeep: New seals lower the risk of water damage, insect invasions, and other problems.
- Prolonged door life expectancy: By securing the door from wear and tear, new seals can extend the door's life-span.
Often Asked Questions
Q: Can I utilize any kind of seal for my bifold door?A: No, it's essential to select a seal specifically created for your door type and application.
Q: How often should I replace bifold door seals?A: Seals can last for numerous years, however it's recommended to check them regularly and replace them every 5-10 years or as needed.
Q: Can I install replacement seals myself?A: Yes, installing replacement seals is a relatively straightforward process, however if you're not comfy with DIY tasks, it's advised to employ an expert.
Q: Are replacement bifold door seals expensive?A: Replacement seals can differ in price, depending on the type and quality, however they are typically a cost effective option compared to replacing the whole door.
Conclusion
Replacement bifold door seals are an essential element of maintaining the efficiency, energy effectiveness, and life expectancy of your bifold doors. By understanding the types, setup process, and benefits of replacement seals, you can guarantee your doors continue to operate smoothly and efficiently. Keep in mind to inspect your seals frequently and replace them as needed to avoid expensive repairs and maintain a comfy living or workplace.
Extra Tips:
- Regularly tidy and preserve your bifold doors to avoid wear and tear.
- Examine your seals routinely to determine possible issues early.
- Consider updating to premium seals for improved performance and sturdiness.
Replacement Bifold Door Seal Checklist:
- Inspect the door edges for signs of wear and tear
- Procedure the door to determine the proper seal size
- Pick the proper type of seal for your door type and application
- Clean the door edges before installing the new seal
- Use the seal to the door edges, ensuring a tight fit
By following this thorough guide, you'll be well on your way to guaranteeing your bifold doors run smoothly and successfully for years to come.
The Art of Hinges and Handles Repair: A Comprehensive Guide
Hinges and handles are little yet essential elements of doors and kitchen cabinetry, influencing both the performance and aesthetics of a space. Over time, wear and tear can cause problems varying from squeaky hinges to handles that refuse to turn. This guide looks into the common issues connected to hinges and handles, provides repair strategies, and shares preventive procedures to guarantee these parts sustain their functionality for several years to come.
Comprehending Hinges and Handles
Hinges are connected to doors and cabinets, permitting them to swing open and closed. They come in different types, including:

- Butt Hinges: Common for doors, these include 2 plates joined by a pin.
- Piano Hinges: Long and constant, piano hinges supply strength and support over larger surfaces.
- Strap Hinges: Often used for gates, these hinges are long and ornamental.
Handles, on the other hand, are used to open and close doors, drawers, and cabinets. They can be simple knobs or more complex designs like levers or pulls.
Common Issues with Hinges and Handles
Like any element, hinges and handles can experience problems. Acknowledging these issues early can avoid more damage. Common problems consist of:
- Squeaking Hinges: This normally shows the need for lubrication or misalignment.
- Loose Handles: Over time, screws can loosen up, resulting in unstable handles.
- Rusty Hinges: Metal elements can wear away, particularly in humid environments.
- Broken Handles: This might result from extreme force or poor manufacturing.
Fixing Hinges
Repairing hinges typically needs a few fundamental tools and supplies. Here's a detailed guide:
Tools and Supplies Needed:
- Screwdriver (flathead or Phillips, depending upon the screws)
- Lubricant (WD-40, silicone spray, or grease)
- Replacement screws or hinges (if necessary)
- Rags for cleaning
Steps to Repair Hinges:
- Identify the Problem: Determine whether the hinge requires lubrication, change, or replacement.
- Remove the Hinge (if required): Unscrew the hinge from the door or frame thoroughly. Hold the door to prevent it from falling.
- Tidy the Hinge: Wipe it down with a rag to remove dirt or debris. For rusty hinges, think about using a rust cleaner.
- Lube the Hinge: Apply lubricant to the hinge mechanism. Open and close the door a few times to work it in.
- Change Alignment: If the hinge is out of alignment, realign it before reattaching it.
- Reattach the Hinge: Use screws to protect the hinge back onto the door or frame. Make certain they are tight, but prevent over-tightening.
- Check the Door: Open and close the door to guarantee a smooth operation.
Repairing Handles
Handles are straightforward to repair, depending upon their structure. The following guide does not use to all types but covers the most common issues.
Tools and Supplies Needed:
- Screwdriver
- Replacement screws or handle (if necessary)
- Wood glue or epoxy (for broken handles)
- Rags for cleansing
Steps to Repair Handles:
- Identify the Issue: Check for looseness, damage, or misplacement.
- Tighten Screws: Often, simply tightening up the screws with a screwdriver can fix loose handles.
- Reattach Broken Handles: If a handle has actually broken off, apply wood glue or epoxy to the break, hold it together, and let it treat based on the item directions.
- Change if Necessary: If the handle is beyond Local Repair for door handle, eliminate it entirely, and change it with a brand-new one. Make sure the brand-new handle matches the existing holes.
- Test the Handle: After repairs, test the handle to ensure it operates correctly and is firmly attached.
Avoiding Future Issues
Taking preventive measures can extend the lifespan of hinges and handles. Think about these tips:
- Regular Cleaning: Dust and tidy hinges and handles regularly to prevent buildup.
- Lube Periodically: Apply lubricant to hinges every few months to avoid squeaks.
- Tighten up Screws: Periodically examine for loose screws and tighten them as needed.
- Select High-Quality Components: Invest in durable hinges and handles that are made to endure wear and tear.
Frequently asked questions
Q1: How typically should I lube my hinges?
A: It is recommended to lubricate hinges at least every three to six months, or more regularly in areas with high humidity or usage.
Q2: Can I change a handle without getting rid of the door?
A: Yes, in most cases, you can replace a handle without totally removing the door. Nevertheless, loosening up the door can offer easier gain access to.
Q3: What should I do if a hinge is rusted?
A: For rusted hinges, try cleaning them with a rust remover. If the damage is serious, think about replacing them entirely.
Q4: Can I repair a handle that is split?
A: Depending on the crack's intensity, you may be able to use wood glue or epoxy to repair it. If the damage is considerable, changing the handle may be required.
Q5: Are there special tools needed for hinge and handle repair?
A: Basic tools like screwdrivers, lubricants, and rags are generally enough for small repairs. More specialized tools might be required for extensive jobs.
The repair of hinges and handles might appear minor, yet these elements play a crucial function in home performance and visual appeals. By familiarizing yourself with common issues, utilizing the right tools, and following systematic repair actions, one can extend the life of these everyday essentials. Remember, preventive care is crucial to minimizing future repairs, ensuring that doors and cabinets remain both functional and visually appealing for many years.

The Comprehensive Guide to Door Hinge Fixers
Door hinges are integral components of any door's functionality. They not only enable doors to swing open and closed smoothly but likewise bear the weight of the door. Gradually, nevertheless, they can become loose, squeaky, and even rusty, causing issues such as misalignment or problem in closing the door. This is where door hinge fixers enter into play, offering services to restore performance and aesthetic appeals. This short article explores the kinds of door hinge fixers, the procedure of repairing door hinges, and addresses frequently asked concerns regarding this essential home maintenance topic.
Understanding Door Hinges and Their Common Issues
Before checking out the numerous choices for repairing door hinges, it's essential to understand the types of door hinges and the common problems that can occur.
Kinds Of Door Hinges
- Butt Hinges: The most typical type, utilized for basic doors. They include 2 plates joined by a pin.
- Constant Hinges: Also referred to as piano hinges, these run the entire length of the door, offering additional support.
- Spring Hinges: These hinges instantly close the door after it is opened, commonly utilized in commercial settings.
- Pocket Hinges: These are used for pocket doors, which slide into a wall when opened.
- Pivot Hinges: Allow a door to pivot from a single point, used in heavy or large doors.
Common Door Hinge Problems
- Squeaky Hinges: Often brought on by absence of lubrication.
- Loose Hinges: Can result from wear and tear or the wood around the screws becoming removed.
- Rusty Hinges: Common in exterior doors or in humid environments.
- Misaligned Hinges: Can trigger the door to rub against the frame or not close appropriately.
Table 1: Door Hinge Issues and Solutions
| Issue | Causes | Solution |
|---|---|---|
| Squeaky Hinges | Lack of lubrication | Apply lubricant (WD-40, silicone spray) |
| Loose Hinges | Stripped screws or wood | Change screws or utilize wood filler |
| Rusty Hinges | Direct exposure to wetness | Tidy rust, use rust-resistant spray |
| Misaligned Hinges | Use and tear, inappropriate installation | Adjust hinges or reposition door |
The Importance of Using a Door Hinge Fixer
A door hinge fixer is a specific tool or solution developed to address issues with door hinges efficiently. Depending upon the issue, this might include lubricants, replacement screws, or tools to realign the hinges.
Advantages of Using a Door Hinge Fixer
- Improves Door Functionality: Fixing squeaky or misaligned hinges enables smooth operation of the door.
- Boosts Safety: Properly operating hinges make sure that doors close safely, lowering the threat of injury.
- Extends Longevity: Regular maintenance with door hinge fixers can lengthen the life of both the hinges and the door itself.
- Visual Appeal: Well-functioning hinges contribute to the general look of the door.
The Process of Fixing Door Hinges
Fixing door hinges can be an uncomplicated process, depending on the problem. Here is a detailed guide to address typical hinge problems.
Step-by-Step Fixing Techniques
Lubrication:
- Use a suitable lubricant like WD-40 or silicone spray.
- Apply straight to the hinge and move the door backward and forward to disperse it.
Tightening Up Loose Hinges:
- Use a screwdriver to tighten existing screws.
- If screws are removed, replace them with longer screws or utilize wood filler to reestablish the grip.
Cleaning Rusty Hinges:
- Remove the hinge from the door utilizing a screwdriver.
- Clean the rust with sandpaper or a rust remover.
- Use a rust-resistant spray before re-installing.
Aligning Misaligned Hinges:
- Loosen the screws slightly without removing them.
- Adjust the hinge to the preferred position and tighten screws back.
Replacing Hinges:
- If the hinges are harmed beyond repair, remove them from the door.
- Pick brand-new hinges that match the size and kind of the old ones.
- Set up by aligning the brand-new hinges and protecting them with screws.
Table 2: Comprehensive Fixing Guide
| Problem | Fixing Technique |
|---|---|
| Squeaky Hinges | Apply lube |
| Loose Hinges | Tighten up screws or change with longer screws |
| Rusty Hinges | Clean with sandpaper and use rust-resistant spray |
| Misaligned Hinges | Adjust hinge and reposition door |
| Harmed Hinges | Change with new hinges and install appropriately |
Frequently Asked Questions (FAQs)
1. How often should I lube my door hinges?
It is great practice to lubricate door hinges every six months or as required, specifically in high-traffic locations.
2. What kind of lubricant should I use for door hinges?
A silicone spray or a light-weight oil like WD-40 is ideal for lubricating hinges. Avoid utilizing heavy oils which can bring in dust and dirt.
3. Can I fix a removed screw hole in a door?
Yes, you can fix a stripped screw hole by placing a wooden dowel or utilizing wood filler. Once dry, re-drill the hole for the screw.
4. How can I inform if my door hinges need changing?
If the door frequently squeaks, does not close appropriately, or if the hinges reveal noticeable damage or rust, it might be time for replacement.
5. Can I utilize household products to tidy rusty hinges?
Yes, you can utilize household items like vinegar or sodium bicarbonate combined with water to clean light rust, followed by drying and applying a rust-resistant spray.
Door hinge fixers are essential tools for preserving the practical stability of doors in any home or company. By understanding the types of hinges, the common issues they face, and the actions associated with fixing them, house owners can make sure that their doors run smoothly and stay visually pleasing. Regular maintenance is essential to extending the life of door hinges, and utilizing suitable fixers will ultimately result in a safer and more satisfying living space. Whether it's an easy lubrication or a total hinge replacement, keeping the hinges in good shape is a job worth endeavor.

Understanding Door Hinge Adjusters: A Comprehensive Guide
Door hinge adjusters are an important yet typically neglected component in both domestic and industrial environments. These relatively unimportant tools play a critical function in making sure that doors function correctly, keep their aesthetic appeal, and supply safety and security. This article delves into the different kinds of door hinge adjusters, their benefits, installation procedures, and maintenance tips, providing a comprehensive guide for both homeowners and professionals.
What Are Door Hinge Adjusters?
Door hinge adjusters are gadgets created to customize the position of a door within its frame. This adjustment can assist resolve issues such as misalignment, gaps, and problems in opening or closing. Normally, hinge adjusters work by either raising or reducing the door, changing the angles of the hinges, or adjusting the lateral position of the door.
Types of Door Hinge Adjusters
Adjustable Hinges:
- These hinges come geared up with an integrated system that enables minor changes.
- They normally feature a set of screws that, when turned, raise or reduce the door slightly.
Shims:
- Shims are slices of material, typically wood or plastic, placed in between the door frame and the hinge.
- They supply a fast and inexpensive method to adjust the alignment of the door hinge repairman.
Joint or Hinge Plates:
- These plates act as an anchor for the hinge while allowing for micro-adjustments.
- They are typically seen in specialized applications such as commercial doors.
Spring-Loaded Hinge Adjusters:
- This type features a spring mechanism that makes up for minor shifts in the door's position.
- These are particularly beneficial in high-traffic locations.
Benefits of Using Door Hinge Adjusters
Door hinge adjusters offer a multitude of benefits:
Improved Functionality: Proper adjustments guarantee that doors close safely and open smoothly.
Increased Safety: Misaligned doors can position safety threats. Effectively changed doors minimize the threat of mishaps.
Energy Efficiency: Gaps brought on by misalignment can cause drafts, increasing energy costs. Adjusting hinges can help maintain the integrity of your home's insulation.
Aesthetic Appeal: Well-aligned doors look better and enhance the general appearance of a space.
When to Use Door Hinge Adjusters
Numerous situations might demand making use of door hinge adjusters:
New Door Installation: Ensuring that a new door is appropriately lined up from the start can avoid future issues.
Seasonal Changes: Wood and other materials can expand or contract with temperature modifications, demanding modifications to maintain door alignment.
Use and Tear: Over time, regular use can lead to misaligned doors. Routine maintenance checks can recognize when adjustments are required.
Accidental Damage: Collisions or heavy impacts can displace a door, prompting the need for adjustment.
How to Install Door Hinge Adjusters
Setting up door hinge adjusters can differ based on the type utilized. Nevertheless, the following basic actions can assist most modifications:
Tools Needed:
- Screwdriver
- Level
- Shims (if required)
- Measuring Tape
Guidelines:
Evaluate the Door: Check for spaces and observe how the door operates. Determine which hinge requirements adjustment.
Loosen the Hinge Screws: Using a screwdriver, a little loosen up the screws on the hinge to allow for motion.
Adjust the Hinge:
- For adjustable hinges: Turn the adjustment screws to raise or decrease the door.
- For shims: Slide shim material between the hinge and the door or frame.
Inspect Alignment: Use a level to guarantee the door is lined up correctly both horizontally and vertically.
Tighten up the Screws: Once changed, securely tighten the screws and recheck the alignment.
Check the Door: Open and close the door to make sure smooth operation.
Keeping Door Hinge Adjusters
Routine maintenance of door hinge adjusters can extend their lifespan and ensure optimum functionality. Consider the following maintenance tips:
Periodic Checks: Inspect hinges and adjusters every few months, particularly in high-traffic areas.
Tidy the Hinges: Over time, dirt and particles can collect. Clean with a damp fabric and oil regularly.
Tighten Screws: Make it a routine to look for loose screws when performing routine home maintenance.
Replace Worn Components: If changes no longer achieve the wanted impact, think about changing used hinges or adjusters.
Summary Table of Door Hinge Adjusters
| Type | Description | Pros | Cons |
|---|---|---|---|
| Adjustable Hinges | Integrated adjustment mechanism | Easy to install, versatile | Minimal variety of movement |
| Shims | Thin material for alignment | Cost-efficient, easy to use | May need multiple pieces |
| Joint or Hinge Plates | Anchor with micro-adjustments | Trustworthy for industrial use | Complex installation |
| Spring-Loaded Hinge Adjusters | Compensates for shifts | Great for high-traffic areas | More pricey than others |
Often Asked Questions (FAQs)
1. How often must I adjust my door hinges?Adjustments need to be made as needed, typically during seasonal changes or following any obvious misalignment. 2. Can I use door hinge adjusters on all kinds of doors?While most door hingeadjusters can be used on numerous door types, specific hinges might work better with specific products( e.g., solid wood vs. hollow-core doors). 3. What tools do I need for changing door hinges?A screwdriver, level, measuring tape, and perhaps shims are usually sufficient. 4. Are door hinge adjusters weather-resistant
? Many adjustable fittings are designed for indoor use; however, some items are specifically made
to stand up to outside conditions. 5. What ought to I do if the door still does not line up after adjustments?If the door stays misaligned, inspect for other issues such as deformed frames or harmed hinges that may need replacement.
Door hinge adjusters may not get the attention they should have, yet they play a necessary role in the longevity and functionality of doors. By understanding the different types, when to use them, and how to maintain them, homeowners and professionals alike can make sure doors operate efficiently and efficiently. Whether setting up a new door or resolving wear and tear, executing routine adjustments is crucial to maintaining a safe, safe, and attractive environment.
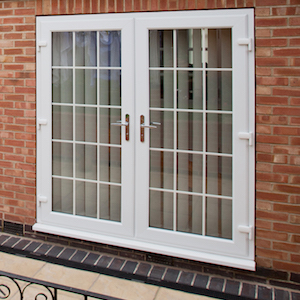
Understanding French Door Windows: Elegance Meets Functionality
French door windows have actually become synonymous with ageless sophistication and useful design in contemporary architecture and home remodellings. These elegant structures offer not just aesthetic appeal however likewise functionality by allowing sufficient light and fluidity between spaces. This short article explores the different elements of French door windows, including their types, advantages, setup considerations, upkeep, and frequently asked questions.
What are French Door Windows?
French door windows are normally defined by their dual-door style, including a series of glass panes that offer an unblocked view and simple access to outside spaces. While traditional French doors are hinged, contemporary versions frequently are available in sliding or bi-fold configurations. These doors can be utilized in various settings, consisting of patio areas, gardens, and even inside your home to separate various living areas.
Table 1: Comparison of French Door Styles
| Design | Description | Pros | Cons |
|---|---|---|---|
| Hinged French Doors | Doors that open outside or inward when unlatched. | Elegant look; traditional design. | Needs clearance space for opening. |
| Sliding French Doors | Doors move along a track rather than opening outwards. | Space-saving; easier for high traffic. | Might have a lower visual appeal. |
| Bi-fold French Doors | Multiple panels that fold and stack to one side. | Makes the most of opening, great for access. | Can be more costly; needs more area. |
Advantages of French Door Windows
French door windows feature a plethora of benefits that make them an attractive option for house owners:
- Natural Light: The extensive glass design invites natural light into the home, lightening up spaces and lowering the requirement for artificial lighting.
- Visual Appeal: Their classic style enhances the aesthetic of a home, adding elegance and elegance. They can become a centerpiece in foyers, dining spaces, or living areas.
- Increased Ventilation: French doors can be opened completely to supply exceptional cross-ventilation, lowering indoor humidity and improving air quality.
- Flexibility: They can be utilized in a variety of locations, such as outdoor patios, balconies, gardens, or as interior dividers.
- Increased Property Value: The addition of French door windows can improve the allure of a residential or commercial property, making it more attractive to potential buyers.
Popular French Door Window Materials
French doors can be made from a range of products, each of which has its own distinct features:
- Wood: Traditional choice understood for its charm and insulation residential or commercial properties. However, wood requires regular maintenance.
- Vinyl: Low maintenance with outstanding energy performance. Readily available in various colors and designs but typically less standard in appearance.
- Aluminum: Durable and resistant to weather, allowing for large panes of glass. Nevertheless, they conduct heat, so they may not be as energy-efficient.
- Fiberglass: Offers the look of wood however with low maintenance. It's energy-efficient and resistant to warping.
Installation Considerations
When planning to install French door aluminium windows & doors (https://www.maearnoldy.top/), several elements ought to be considered:
- Space: Ensure that there is adequate area for the design chosen, especially for hinged or bi-fold doors that need clearance for opening.
- Design and style: Consider the architectural style of the home and choose a design that matches it.
- Energy Efficiency: Look for doors with double glazing and premium seals to minimize energy loss.
- Local Climate: Some door products perform better in particular climates. For example, wood might swell in damp conditions, while aluminum is more suited for coastal areas.
- Expert Help: Installation may require professional know-how, especially if structural changes are needed.
Maintenance of French Door Windows
Preserving French door windows is necessary to ensure their longevity and ideal performance. Here are some upkeep pointers:
- Regular Cleaning: Clean the glass and frames routinely utilizing moderate soap and water to remove dirt, grime, and fingerprints.
- Check Seals: Inspect seals and weather-stripping occasionally to prevent leaks and drafts.
- Paint or Stain: If made of wood, frequently repaint or stain the surface areas to secure versus weathering.
- Hardware Inspection: Ensure hinges, handles, and locking mechanisms remain in great working condition and lube them when needed.
Regularly Asked Questions (FAQs)
1. Are French doors energy efficient?
Yes, numerous contemporary French doors included energy-efficient features like double or triple glazing, which assists to decrease heat loss and UV direct exposure.
2. Just how much do French door windows cost?
The cost can vary widely depending on style, product, and setup intricacies. Standard designs might begin around ₤ 500 per door, while custom-built or high-end choices can exceed ₤ 2,000.
3. Can French doors be installed in existing walls?
Yes, French doors can be installed in existing walls, however it typically needs structural adjustments. Hiring an expert specialist is advised for such projects.
4. Are French doors secure?
While some individuals may presume French doors are less protected, manufacturers offer enhanced glass and lock systems that can improve security.
5. Can French doors be utilized inside?
Definitely! French doors can function as elegant space dividers, adding character and offering sight lines in between areas while maintaining a border.
French door windows use a superb mix of charm and useful performance, making them a favored choice for homeowners aiming to enhance their home. They offer a distinct chance to frame the outdoors, take full advantage of natural light, and improve indoor airflow, all while serving as a trendy architectural feature. By considering the different choices offered and their upkeep needs, house owners can take pleasure in the benefits of French door windows for years to come.
Title: The Ultimate Guide to Obtaining a Category B Driving License
Introduction

For many individuals, acquiring a driving license is a significant milestone that represents independence, flexibility, and mobility. Amongst the different classifications of driving licenses, Category B is one of the most common and desired licenses, enabling individuals to drive automobile and light vans. This post will provide a thorough guide to getting a Category B driving license, including the requirements, actions, and frequently asked questions.
Requirements for Obtaining a Category B Driving License
To obtain a Category prawo jazdy kategorii b driving license, candidates should satisfy the following requirements:
- Age: In a lot of countries, applicants should be at least 17 years old to apply for a Category B driving license, although some nations may have greater age limitations.
- Medical Fitness: Applicants should undergo a medical checkup to ensure they are physically and psychologically fit to drive.
- Theory Test: Applicants should pass a theory test that covers traffic guidelines, road signs, and threat perception.
- Dry Run: Applicants need to pass a useful driving test that assesses their ability to run a car securely and effectively.
Actions to Obtaining a Category B Driving License
Step 1: Medical Examination
The primary step to acquiring a Category B driving license is to go through a medical checkup. This examination usually consists of a hearing and vision test, in addition to a check of the applicant's medical history.
Action 2: Theory Test
Once the medical assessment is complete, candidates can begin preparing for the theory test. This test includes multiple-choice concerns and risk understanding scenarios, and candidates should achieve a minimum score to pass.
Action 3: Practical Training
After passing the theory test, applicants should complete a minimum number of practical training hours with a licensed driving trainer. The variety of hours required might vary depending on the country and the applicant's prior driving experience.
Step 4: Practical Test
The last action in obtaining a Category B driving license is to pass the practical driving test. This test consists of a series of maneuvers, such as reversing, parking, and driving in traffic, and the applicant must show safe and competent driving abilities.
FAQs
- For how long is a Category B driving license legitimate?A Category B driving license is typically valid for 10 years, after which it needs to be renewed.
- Can I drive a motorhome with a Category B driving license?In most nations, a Category B driving license allows people to drive motorhomes with a maximum weight of 3,500 kg. Nevertheless, if the motorhome has a weight surpassing this limitation, a higher classification of driving license may be required.
- Can I tow a trailer with a Category B driving license?In most countries, a Category B driving license allows people to tow a trailer with a maximum weight of 750 kg. However, if the combined weight of the automobile and trailer surpasses 3,500 kg, a greater category of driving license may be required.
- Can I drive a minibus with a Category B driving license?In most countries, a Category B driving license allows people to drive a minibus with an optimum of 9 seats, consisting of the motorist's seat. However, if the minibus has more than 9 seats, a higher category of driving license might be required.
Conclusion
Getting a Category B driving license is a substantial turning point that requires devotion, preparation, and adherence to specific requirements and steps. By following the guidelines described in this post, candidates can increase their opportunities of success and delight in the freedom and movement that comes with holding a valid driving license.
List of Tips:
- Schedule routine medical check-ups to guarantee continued physical fitness to drive.
- Research study regularly for the theory test to ensure a high level of understanding and understanding.
- Practice driving with a licensed trainer to establish safe and skilled driving skills.
- Follow all traffic rules and regulations during the practical driving test.
- Maintain a legitimate driving license and restore it as needed.
