泰斗学习
站点博客
Window Scratch Removal: Effective Techniques for a Clear View
Window scratches can be a significant annoyance for property owners and vehicle owners alike. They can block views, affect visual appeals, and even manage the incoming light. While deep scratches might need professional intervention, many small scratches can be eliminated through various DIY methods. This post will supply a thorough overview of reliable techniques for window scratch removal, the essential products, and frequently asked questions to assist readers in attaining a clear and scratch-free surface area.
Comprehending Window Scratches
Scratches on windows can emerge from various sources, consisting of:
- Accidental contact with tough things like secrets or metal tools.
- Environmental factors such as particles blown by wind or tree branches throughout storms.
- Incorrect cleansing techniques utilizing abrasive cloths or strong chemicals.
Different kinds of window products, such as glass, plexiglass, or acrylic, may have differing susceptibilities to scratches. Therefore, it's important to identify the window type before selecting a removal approach.

Strategies for Removing Window Scratches
The following table describes numerous methods for getting rid of scratches from windows, in addition to the involved products and techniques.
| Method | Materials Needed | Steps |
|---|---|---|
| 1. Sodium Bicarbonate Paste | Baking soda, water, soft fabric | 1. Mix baking soda with water to form a paste. 2. Apply to the scratched location using a soft fabric. 3. Rub gently in a circular motion for a couple of minutes. 4. Wash with water and dry with another fabric. |
| 2. Tooth paste | Non-gel toothpaste, soft cloth | 1. Use a percentage of tooth paste directly on the scratch. 2. Carefully rub in a circular movement with a fabric. 3. Wipe away excess with a moist fabric. 4. Dry entirely. |
| 3. Glass Polishing Compound | Glass polish, soft cloth | 1. Use a little quantity of glass polish to a tidy cloth. 2. Rub it into the scratch utilizing circular movements. 3. Buff the area up until clear. 4. Tidy the surface area with a damp cloth. |
| 4. Cerium Oxide | Cerium oxide powder, water, soft cloth | 1. Mix cerium oxide powder with water to form a paste. 2. Apply to the scratch utilizing a felt applicator or soft cloth. 3. Rub in a circular motion for a number of minutes. 4. Clean the area with a moist cloth to remove residue. |
| 5. Great Sandpaper | 2000-grit sandpaper, water | 1. Dampen the sandpaper and window. 2. Gently rub the scratch in a straight line. 3. Rinse and dry the location completely. 4. Apply glass polish to bring back clarity. |
Crucial Tips
- Always check any technique on a little, unnoticeable location of the window first to guarantee it doesn't cause additional damage.
- When using abrasives like sandpaper, it's recommended to be mindful and use minimal pressure to prevent creating further scratches.
Preventive Measures for Future Scratches
To reduce the risk of future scratches, think about the following preventive measures:
- Use Soft Cleaning Materials: Opt for microfiber cloths or soft sponges when cleaning up to avoid scratching.
- Avoid Abrasive Cleaners: Steer clear of harsh chemicals and gritty cleaners that can etch glass surface areas.
- Carry Out Protective Films: Consider setting up protective movies on windows, especially in lorries, to protect versus minor dings and scratches.
- Keep Windows Free of Debris: Regularly tidy the outdoors and within surfaces to avoid dirt buildup that can scratch throughout cleansing.
- Be Mindful During Repairs: When working around windows, be additional cautious with tools and materials that could accidentally call the glass.
Regularly Asked Questions (FAQs)
1. Can all window scratches be eliminated?
Not all scratches can be successfully removed. Deep cracks or chips typically require professional repair or replacement. Small surface scratches, nevertheless, can often be treated using the methods pointed out above.

2. Is it safe to utilize sandpaper on glass windows?
Using sandpaper can run the risk of further scratching if done incorrectly. If you select to use this technique, select very fine sandpaper (2000-grit) and use minimal pressure. This technique typically works as a last hope; thus, caution is a good idea.
3. How do I understand what kind of window I have?
Normally, glass windows are transparent and cold to the touch. Acrylic or plexiglass windows are normally lighter, more flexible, and may have a slightly plastic texture. Consider carrying out a scratch test in an unnoticeable location; glass will chip while acrylic will scuff.
4. Will professional services ensure scratch removal?
Professional glass repair services often have actually specialized tools and compounds for scratch removal. While many scratches can be eased, total restoration may not constantly be possible, especially with deep abrasions.
5. How typically should I clean up windows to prevent scratches?
Routine cleaning is recommended, however it needs to be carried out with care. Cleaning window surface areas about when a month with the appropriate items and approaches can help keep their clarity and prevent the accumulation of dirt that causes scratches.
Window scratches can reduce the charm and functionality of glass surfaces. However, understanding effective removal methods and taking preventive procedures can substantially boost a window's longevity and appearance. By utilizing basic family items or specialized items, house owners and lorry owners can frequently restore clarity and make sure an ongoing clear view. With the ideal knowledge and tools, keeping scratch-free windows is achievable.
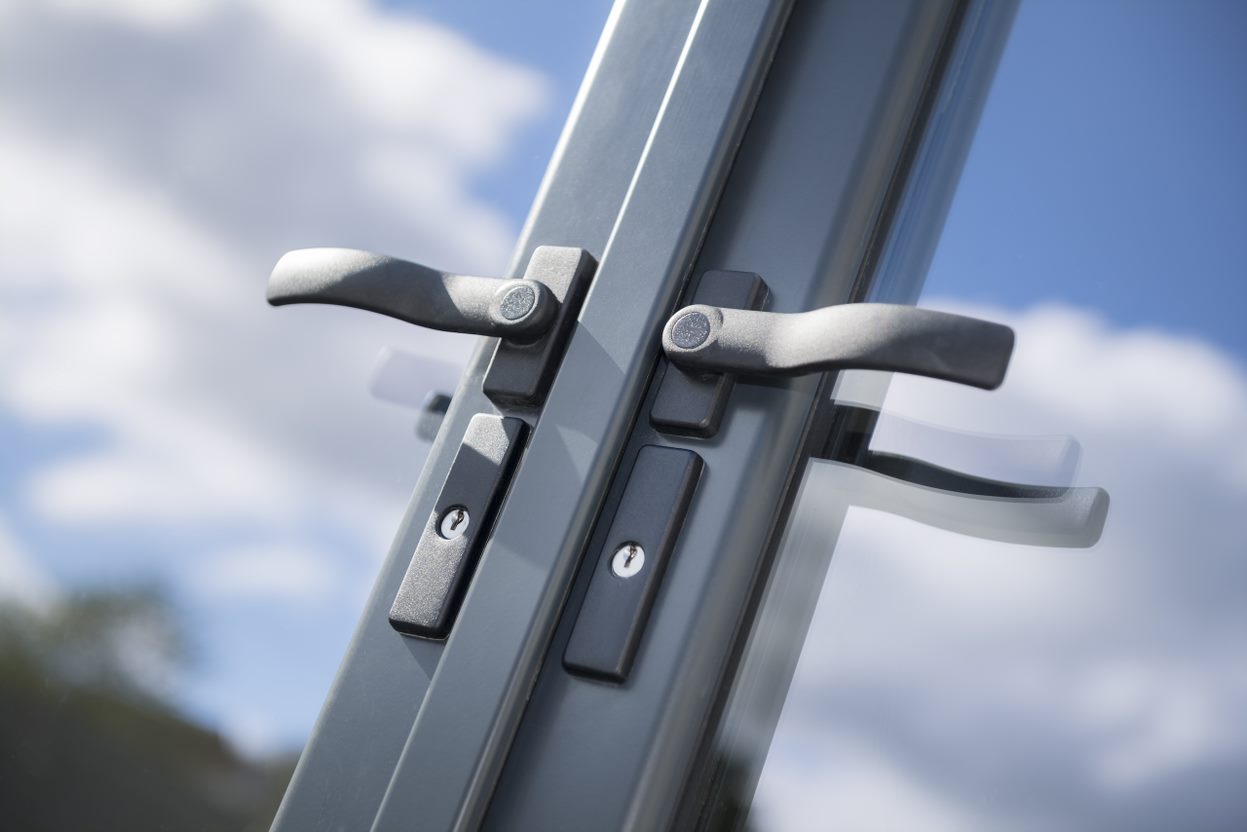
Elevating Your Space: The Comprehensive Guide to Door Handle Upgrades
Updating door handles might look like a minor home enhancement task, yet it can substantially boost the visual appeal and functionality of any space. Whether renovating a whole home or simply refreshing a few select spaces, new door handles can serve as an unrecognized hero of style, including beauty and flair to both residential and commercial residential or commercial properties. This article delves into the value of door handle upgrades, the different designs available, the aspects to think about, and a DIY method for those aiming to undertake their own upgrade.
Why Upgrade Door Handles?
Upgrading door handles can appear insignificant when thinking about bigger renovations fresh flooring or fresh paint. Nevertheless, door handles serve as both practical hardware and ornamental accents. Here are some compelling reasons to think about an upgrade:
Aesthetic Enhancement: New handles can instantly improve the feel and look of a room, complementing your existing design and raising your home's total design.
Enhanced Functionality: Often, older handles may become sticky or hard to open. Upgrading to brand-new handles can enhance usability, particularly for kids and the elderly.
Increased Security: Modern door handles often consist of much better locking mechanisms and products that can prevent unwanted access.
Boosted Property Value: A well-maintained and stylishly designated home can result in greater resale worths. Updating fixtures such as door handles can contribute to this appeal.

Personalization Opportunities: With various designs and surfaces offered, house owners can personalize door handles to fit their individual tastes and home design themes.
Numerous Styles of Door Handles
When it pertains to door handle styles, the choices can be frustrating. Here are some popular alternatives classified for clarity:
1. Conventional
- Lever Handles: Best for a classic look, they are simple to run and frequently made from brass or bronze.
- Knobs: Available in numerous products and blends well with vintage or cottage-style homes.
2. Contemporary
- Minimalist Levers: Sleek and basic, these handles often include geometric shapes and surface choices like stainless-steel or matte black.
- Magnetic or Touch Less Handles: Technology-driven choices that enhance convenience and are great for modern areas.
3. Rustic
- Reclaimed Wood Handles: Ideal for a cabin or farmhouse appearance, these offer a warm, welcoming touch.
- Antique-Finished Metal: Adds character and beauty, often fitting well into a rustic or industrial style.
4. Smart Handles
- Keyless Entry Systems: These high-tech handles couple with clever home systems, enabling lock control by means of mobile phones.
- Biometric Locks: Providing added security through fingerprint acknowledgment, suitable for high-security applications.
Factors to Consider
When selecting a door handle upgrade, numerous factors need to be remembered to make sure the ideal option for your space:
Compatibility: Consider the existing door thickness and the type of latch or lock already in location. The majority of handles are created for standard measurements, but variations do exist.
Material Quality: Assess the resilience and aesthetic appeal of the materials. Strong metals usually supply higher durability compared to plastic.
Ergonomics: Choose handles that fit easily in hand, especially for those with mobility issues.
Finish Type: The finish should line up not only with the desired visual however likewise with the performance. For circumstances, satin surfaces withstand finger prints, while polished finishes may require more maintenance.
Design Cohesion: Ensure that selected handles complement the more comprehensive theme of your home, integrating seamlessly with other design aspects.
DIY Installation Steps
For the ambitious house owner, updating door handles can be a manageable DIY task. Here's a detailed guide:
Preparation
Collect Tools: You will need a screwdriver (flat and Phillips), determining tape, a pencil, and perhaps a drill for new hole placements.
Select Your Handles: Ensure they fit your desired design and compatibility with existing doors.
Installation Process
Get Rid Of Old Handles:
- Unscrew the existing handles from the door.
- Carefully pull the handle and eliminate the latch mechanism if replacing.
Measure for New Handles:
- Measure the existing holes to guarantee brand-new handles align.
- If drilling brand-new holes, measure the distance from the edge of the door to the center of the handle.
Install the Latch:
- Insert the brand-new latch mechanism into the edge of the door handle repair company and secure it with screws.
Connect the Handles:
- Align the handles with the lock, ensuring they fit snugly.
- Protect the handles with the offered screws.
Test Functionality:
- Open and close the door several times to guarantee smooth operation.
Last Touches
- Clean the location around the handle and appreciate your new upgrade!
Frequently Asked Questions (FAQs)
1. How often should I consider updating door handles?
While there's no stringent timeline, it's an excellent concept to reassess door handles every 5 to 10 years. If you see indications of wear, malfunction, or if you're upgrading the overall decoration of your home, it might be time for an upgrade.
2. Are there any particular brand names known for high-quality door handles?
Brand names such as Schlage, Kwikset, Baldwin, and Emtek have a reputation for producing premium and stylish door handles. Evaluate reviews and consumer feedback to discover the very best suitable for your needs.
3. Can I mix different door handle designs in my home?
While it's generally best to preserve style cohesion, including various handle designs can add character if done attentively. For instance, maintaining a color plan or material consistency can assist merge the look.
4. What if I have difficulty installing the handles myself?
If DIY tasks feel daunting, think about hiring a regional handyman or contractor to guarantee professional installation. This can conserve time and avoid prospective damage.
Updating door handles is a useful yet impactful home improvement job that integrates performance with design. With a selection of designs available and a friendly installation procedure, house owners can easily transform their spaces. Whether one select streamlined modernity or ageless rustic charm, the best door handles can modify not simply the appearance however likewise the feel of a home, blending utility with individual visual.
The Rise of Outdoor Fireplaces: A Comprehensive Guide
Outdoor fireplaces have changed gardens and patios into comfortable and stylish outdoor home. Whether for heat, atmosphere, or cooking, these structures not only increase the utility of outdoor spaces however likewise improve the visual appeal of any lawn. This post explores the various kinds of outdoor fireplaces available for sale, tips on choosing the right one, and essential upkeep factors to consider.
Kinds Of Outdoor Fireplaces
When looking for outdoor fireplaces for sale, prospective purchasers will discover a varied selection of options. Each type has distinct attributes, making them ideal for different requirements and environments. Below is a contrast table showcasing some of the most common outdoor fireplaces:
| Type | Material | Expense Range | Heat Output | Mobility | Cooking Option |
|---|---|---|---|---|---|
| Traditional Brick | Clay or Brick | ₤ 1,000 - ₤ 5,000 | High | Irreversible | Yes |
| Steel Firepit | Steel | ₤ 100 - ₤ 600 | Moderate | Portable | Restricted |
| Stone Fireplace | Natural Stone | ₤ 2,000 - ₤ 10,000 | Very High | Normally Fixed | Yes |
| Gas Fireplace | Metal, Glass | ₤ 1,500 - ₤ 8,000 | Adjustable | Long-term | Yes |
| Fire Bowl | Concrete/Metal | ₤ 150 - ₤ 1,000 | Variable | Extremely Portable | Limited |
Elements to Consider When Choosing an Outdoor Fireplace
Selecting the right outdoor fireplace can be an overwhelming task, particularly provided the myriad choices readily available. To streamline this procedure, prospective purchasers can consider the following essential aspects:
Purpose
- Heating: For areas that experience winter, heating systems with high heat output are vital.
- Cooking: If grilling or cooking is a top priority, select options designed particularly for food preparation.
- Atmosphere: For improving the outdoor environment, decorative models might appropriate.
Readily available Space
- Assess the lawn or patio size to ensure a proportional fireplace. A large design in a compact space can feel claustrophobic.
Product Durability
- The product affects the life expectancy and maintenance of the fireplace. Choices like stone or brick sustain weather condition much better than some metal ranges.
Local Regulations
- Inspect local ordinances concerning outdoor fireplaces. Some areas may have constraints on what types can be used or where they can be set up.
Budget plan
- Prices vary significantly based upon product, size, and features, so specifying a budget early in the process is important.
Advantages of Outdoor Fireplaces
Buying an outdoor fireplace brings numerous benefits, including:
- Extended Living Space: Fireplaces develop a warm environment that allows use of outdoor areas in cooler months.
- Aesthetic Appeal: An outdoor fireplace can function as a focal point and boost the total beauty of one's outdoor design.
- Social Gathering Hub: Fireplaces provide a comfortable setting for events with family and buddies, using warmth and a location to roast marshmallows or share stories.
- Increased Property Value: Well-designed outdoor home can substantially increase residential or commercial property value.
Maintenance Tips for Outdoor Fireplaces
To guarantee longevity and performance, routine maintenance is important. Here are several maintenance tips designed to keep outdoor fireplaces in excellent condition:
Routine Cleaning
- Get rid of ashes and charred wood after each use to avoid build-up and odor.
- Clean the firewall and chimney each year to avoid blockages and ensure proper airflow.
Examine for Damage
- Frequently look for fractures in brick or stone fireplaces and any indications of rust in metal structures. Trigger repair work are important to prevent more deterioration.
Protect from the Elements
- Think about utilizing a weatherproof cover when the fireplace is not in usage, specifically in rainy or snowy conditions.
Usage Seasoned Wood
- If using a wood-burning fireplace, ensure to utilize properly skilled wood to avoid excessive smoke and soot.
Check Gas Lines
- For gas fireplaces, check gas lines routinely for leaks or damages and perform professional maintenance as needed.
Often Asked Questions (FAQs)
1. What is the most affordable alternative for outdoor fireplaces?
Steel fire pits are usually the most affordable alternative, frequently costing in between ₤ 100 and ₤ 600.
2. Are gas fireplaces more pricey to run than wood-burning ones?
Running expenses will depend on local gas prices and fire wood availability, however gas typically provides a cleaner burn and is more hassle-free.
3. Can outdoor fireplaces be utilized in all climate condition?
While numerous outdoor fireplaces are designed to withstand the components, severe climate condition may demand protective measures.

4. How can I enhance my outdoor fireplace area?
Include comfy seating, ambient lighting, or ornamental components such as outdoor rugs to develop a more welcoming atmosphere.
Outdoor fireplaces are an exceptional addition to any home, offering warmth, appeal, and functionality to outdoor areas. With a variety of types readily available and numerous elements to consider before purchasing, anyone can discover the best outdoor fireplace fit to their needs. Regular upkeep ensures these structures continue to boost outdoor experiences for several years to come. As house owners progressively embrace outdoor living, the investment in a top quality outdoor fireplace is one that is sure to pay dividends in comfort and pleasure.
Exploring the Dolce Gusto Machine: A Coffee Lover's Dream in the UK
When it comes to coffee developing, the Dolce Gusto machine has sculpted out a specific niche for itself amongst lovers and casual drinkers alike. Known for its adaptability, ease of usage, and abundant coffee tastes, the Dolce Gusto machine is gaining popularity in the UK. This post dives into the advantages, ranges, and functions of Dolce Gusto machines, helping UK coffee fans make informed choices about their home brewing.
What is a Dolce Gusto Machine?
A Dolce Gusto machine is a single-serve coffee maker created to brew coffee and other drinks from pre-packaged pills. Launched by Nestlé, this machine offers a large assortment of beverages, from espresso and coffee to hot chocolate and iced drinks. The capsule system simplifies the developing procedure, making it available for everyone, despite coffee-making abilities.
Benefits of Owning a Dolce Gusto Machine
1. Adaptability
Dolce Gusto machines are not limited to just coffee; they use a range of beverages, including:
- Espresso
- Cappuccino
- Latte macchiato
- Tea
- Hot chocolate
This substantial choice permits users to accommodate their taste choices and check out new flavours without requiring numerous machines.
2. Convenience
With a Dolce Gusto machine, users can enjoy premium drinks with minimal effort. The capsule system gets rid of the need for grinding, determining, or cleaning coffee grounds. Simply insert a capsule, press a button, and your drink is prepared in minutes.
3. Compact Design
Dolce Gusto machines are available in numerous sizes, making them appropriate for kitchens of all sizes. Their sleek design also makes them an appealing addition to any counter top.
4. Adjustable Drinks
Customers can change the strength and quantity of their beverage by picking different capsule sizes and utilizing the machine's adjustable functions. This results in a customized coffee experience customized to individual choices.
5. Easy Maintenance
The majority of Dolce Gusto machines have removable parts that are dishwasher-safe, making cleaning a breeze. Regular descaling is likewise straightforward, ensuring the machine stays in optimal condition.

Popular Dolce Gusto Machine Models in the UK
Dolce Gusto machines are available in various models, accommodating different requirements and choices. Here are a few of the most popular designs offered in the UK:
| Model Name | Secret Features | Price Range (approx.) |
|---|---|---|
| Dolce Gusto Genio 2 | Compact design, user-friendly controls, customizable drink size | ₤ 70 - ₤ 90 |
| Dolce Gusto Melody 3 | Stylish design with a large water tank, automatic shut-off feature | ₤ 80 - ₤ 100 |
| dolce gusto machine uk Gusto Mini Me | Space-saving design, energy-efficient, vibrant colours | ₤ 60 - ₤ 75 |
| Dolce Gusto Infinissima | Large capability, smooth style, boosted developing innovation | ₤ 85 - ₤ 110 |
| Dolce Gusto Jovia | Easy to utilize and tidy, affordable, excellent for casual usage | ₤ 50 - ₤ 65 |
Choosing the Right Dolce Gusto Machine
When selecting a Dolce Gusto machine, think about the following factors:
1. Size and Design
Pick a design that fits well in your kitchen space and matches your aesthetic choices. If counter area is limited, decide for a more compact design.
2. Consume Variety
Identify which types of drinks interest you most. Some models may offer more choices or specific functions for certain drinks.
3. Alleviate of Use
Make sure that the machine is user-friendly, particularly if several family members would be using it.
4. Price Point
Set a spending plan based on your requirements. Although there are high-end designs with advanced features, numerous affordable alternatives provide excellent worth.
Regularly Asked Questions (FAQs)
1. Are Dolce Gusto pills recyclable?
Yes, Dolce Gusto has actually executed a recycling program for their capsules. Consumers can gather utilized pills and return them to designated points or follow specific recycling guidelines.
2. How do I tidy my Dolce Gusto machine?
The majority of Dolce Gusto machines have detachable parts for simple cleansing. Routine descaling is necessary to keep optimum function, and directions can be discovered in the user handbook.
3. Can I use my own coffee with the Dolce Gusto machine?
Dolce Gusto machines are specifically developed for their proprietary capsules. Utilizing non-compatible coffee might damage the machine or impact the taste of the drink.
4. How long does it require to brew a coffee?
Most Dolce Gusto machines can brew a cup of coffee in under a minute, making it an efficient choice for busy early mornings.
5. Do Dolce Gusto machines require a lot of maintenance?
Dolce Gusto machines are developed to require minimal upkeep. Routine cleansing and descaling will keep them working well.
The Dolce Gusto machine sticks out in the congested market of coffee makers with its flexibility, ease of usage, and compact design. Its wide array of beverages interest varied tastes, making it an outstanding choice for people and households alike. By thinking about elements such as style, beverage range, and budget, possible buyers can choose the ideal machine to improve their coffee experience in your home. Whether one chooses a timeless espresso or a velvety latte, the Dolce Gusto machine is an important addition to any coffee enthusiast's kitchen area in the UK.

The Best Portable Mobility Scooters in the UK: A Comprehensive Guide
Intro
As mobility difficulties become more prevalent amongst elders and individuals with disabilities, portable mobility scooters use a useful option for improving flexibility and self-reliance. These compact, lightweight vehicles are designed to provide a comfortable method for users to travel, whether it's for grocery shopping, family outings, or just taking pleasure in a day in the park. In the UK, improvements in technology and style have actually caused the development of a variety of portable mobility scooters. This article will check out the best alternatives offered, helping readers make notified choices as they look for the most appropriate mobility aid.
What to Look For in a Portable Mobility Scooter
Before diving into specific models, it's essential to understand the features and specifications to consider when picking a portable mobility scooter. Here are some elements to remember:
Key Features:
- Weight Capacity: Ensure the scooter can support the weight of the user easily.
- Battery Life: Consider how far the scooter can travel on a single charge to satisfy the user's normal travel needs.
- Foldability: Check whether the scooter can be quickly folded or dismantled for transportation in a car or mass transit.
- Comfort: Look for adjustable seating and ergonomic controls for a comfortable trip.
- Speed: Evaluate the optimum speed to guarantee it fits within the user's way of life and local regulations.
Table 1: Comparison of the Best Portable Mobility Scooters
| Model | Weight Capacity | Maximum Range | Foldable | Weight (kg) | Price (₤) |
|---|---|---|---|---|---|
| Drive Medical Scout | 114 kg | 10 miles | Yes | 56 | 439 |
| Pride Go-Go Elite Traveller | 136 kg | 14.5 miles | Yes | 27.2 | 849 |
| KYMCO K- Lite | 113 kg | 10 miles | Yes | 25 | 599 |
| Invader I-Vision | 150 kg | 13 miles | Yes | 43 | 799 |
| Roma Medical Doodles | 120 kg | 8 miles | Yes | 34 | 499 |
Leading Portable Mobility Scooters in the UK
Now that we have the necessary criteria laid out, here are a few of the best portable mobility scooters readily available in the UK.
1. Drive Medical Scout
The Drive Medical Scout is a flexible scooter that stabilizes sturdiness with mobility. It has a weight capacity of 114 kg and boasts a maximum series of 10 miles. The Scout is praised for its robust design and ease of use.
Pros:
- Adjustable seat and back-rest for comfort.
- Foldable style, making it appropriate for storage and transport.
- Safe driving experience due to its solid construct.
Cons:
- Heavier compared to other compact designs.
2. Pride Go-Go Elite Traveller
The Pride Go-Go Elite Traveller is a great scooter for users looking for both design and functionality. With a weight capability of 136 kg and a series of 14.5 miles, it is perfect for longer getaways.
Pros:
- Lightweight, making it easy to transfer and manage.
- Excellent turning radius for browsing tight spaces.
- Comfortable tiller with adjustable controls.
Cons:
- Relatively greater price point compared to other designs.
3. KYMCO K-Lite
This scooter is one of the lightest alternatives on the marketplace, weighing simply 25 kg. The KYMCO K-Lite has a weight capacity of 113 kg and a variety of as much as 10 miles. It's developed for users who need a functional and compact scooter.
Pros:
- Extremely lightweight, boosts mobility.
- Compact style makes it easy to maneuver.
- Quick-release battery for basic charging.
Cons:
- Limited range compared to much heavier models.
4. Invader I-Vision
The Invader I-Vision is a durable scooter appropriate for users weighing approximately 150 kg. It provides a smooth trip and a series of Fold Up Scooter Mobility to 13 miles, making it an outstanding option for outdoor experiences.
Pros:
- High weight capability for bigger users.
- Appropriate for both indoor and outside use.
- Comfortable seat with sufficient legroom.
Cons:
- Heavier, hence, may be challenging to lift for some users.
5. Roma Medical Doodles
The Roma Medical Doodles is an economical entry-level option with a weight capability of 120 kg and a maximum variety of 8 miles. It is user-friendly and developed for daily usage within the community.
Pros:
- Budget-friendly rate point.
- Easy to take apart for transport and storage.
- Fine for much shorter journeys around town.
Cons:
- Limited range might not match users with longer travel requirements.
Regularly Asked Questions (FAQs)
Q1: Are portable mobility scooters easy to transfer?
Yes, a lot of portable mobility scooters are designed for easy transport. Lots of models can be folded, dismantled, or both, enabling them to fit into a basic vehicle.
Q2: Do I need a license to drive a mobility scooter in the UK?
No, you do not require a license to operate a mobility scooter; however, you need to familiarize yourself with local regulations worrying their use on public roadways or pavements.
Q3: How quickly can portability scooters go?
The optimum speed of portable mobility scooters typically varies in between 4 to 8 mph. It's important to respect regional speed limitations and policies governing scooter use.
Q4: How do I keep a mobility scooter?
Regular maintenance consists of keeping the battery charged, inspecting tire pressure, cleaning up the scooter's body, and guaranteeing that all mechanical components are in working condition. Be sure to refer to the producer's guidelines for specific upkeep requirements.
Selecting the very best portable mobility scooter in the UK involves thinking about numerous factors, consisting of weight capability, range, foldability, and convenience. With numerous alternatives available, users can discover a scooter that fits their lifestyle and improves their capability to browse the world around them confidently. The Drive Medical Scout, Pride Go-Go Elite Traveller, KYMCO K-Lite, Invader I-Vision, and Roma Medical Doodles are among the top options, each dealing with different needs and preferences. By focusing on private requirements, users can decide that not just improves their mobility however likewise enriches their lifestyle.
Understanding Essential Door Hinge Tools: A Comprehensive Guide
When it pertains to installation, repair, or maintenance of doors, the hinge is a crucial component. Comprehending the tools required for working with door hinges can conserve time and enhance the process, whether you're an expert contractor or a DIY enthusiast. This post will explore various tools utilized for door hinge applications, how they work, and when to use them.
Types of Door Hinges
Before diving into the tools, it's crucial to comprehend the types of door hinges offered. Door hinges come in various designs and products, each serving a special function:

- Butt Hinges: Commonly used on residential doors; they make up 2 plates hinged together.
- Constant Hinges: Also referred to as piano hinges; these run the whole length of the door edge, providing more substantial support.
- Spring Hinges: Offer automated closure; frequently utilized on screen doors or gates.
- Concealed Hinges: Hidden from view when the door is closed, providing a sleek look.
Each type of hinge requires specific tools for installation and maintenance. Below is a list of necessary Emergency Door Hinge Repair hinge tools.
Necessary Door Hinge Tools
| Tool Name | Function | Usage |
|---|---|---|
| Screwdriver | To remove and install screws | Use a flathead or Phillips screwdriver based upon screw type. |
| Sculpt | To mortise the door or frame for hinge positioning | Thoroughly chisel out wood to fit the butt of the hinge. |
| Drill | To develop pilot holes | Pre-drilling holes helps prevent wood from splitting. |
| Hinge Jig | To align hinges easily and properly | Perfect for repeated hinge setups on numerous doors. |
| Level | To make sure that hinges are set up directly | Place a level against the hinge to validate alignment. |
| Hammer | To gently tap hinges into location | Helpful for making slight changes without damaging the door. |
| Determining Tape | To measure hinge placement positions | Ensure exact placement for optimum performance. |
| Allen Wrench | For setting up particular kinds of hinges | Required for protecting specialized hinges that use hex screws. |
In-depth Explanation of Tools
Screwdriver: The most uncomplicated tool, but critical for any hinge-related task. Ensure you have both flathead and Phillips head screwdrivers to accommodate various screw types found in various hinges.
Chisel: For butt hinges, sculpting a mortise in the door or frame is needed. A sharp chisel will permit for tidy, precise cuts, supplying a snug suitable for the hinge.
Drill: A power drill is a flexible tool that can also develop pilot holes, which makes screw installation a lot easier. Use the appropriate drill bit to match the size of the screws.
Hinge Jig: It simplifies the job of lining up hinges on the door and jam precisely. The jig ensures that each hinge is located correctly every time, resulting in effective installations.
Level: A level ensures that hinges are installed flat and efficiently, avoiding door misalignment issues.
Hammer: While a hammer appears easy, it can be critically beneficial for small adjustments. Tapping a hinge with a hammer can assist in fine-tuning its position without damaging it.
Measuring Tape: To prevent errors, determining tape is vital for marking the position where the hinge will be set up.
Allen Wrench: Specific types of hinges, specifically those developed for hidden or concealed approaches, typically require an Allen wrench to secure them effectively.
Installation Process
Setting up door hinges involves numerous actions. While the procedure can differ based on the hinge type, the following steps provide a basic instructions:
Measure and Mark: Using a determining tape, mark the positions for the hinges on both the door and the frame.
Chisel the Mortises: If using butt hinges, mortise the wood to develop recesses for the hinge plates.
Drill Pilot Holes: Use the drill to produce pilot holes that correspond with your screw size, assisting to make sure a smooth installation without damaging the wood.
Line up Hinges: Attach the hinge to the aligned marks on the door and frame using screws.
Check the Door: After protecting the hinges, open and close the door to inspect for proper alignment and function.
Make Adjustments: If the door does stagnate easily or lines up incorrectly, adjustments may be needed. This may involve loosening screws and repositioning the hinge or the door itself.
Maintenance Tips
Maintaining door hinges can enhance the longevity of both the hinges and the door itself. Here are some practical tips for hinge maintenance:
- Lubricate Regularly: Use an appropriate lubricant (like WD-40 or silicone spray) to avoid rust and squeaking.
- Inspect for Wear and Tear: Periodically examine hinges for any indications of rust, wear, or loose screws.
- Tighten Loose Screws: Regularly inspect and tighten up screws to guarantee the hinges remain protected to prevent door misalignment.
FAQs
What are the different types of door hinges?
Door hinges mainly consist of butt hinges, constant hinges, spring hinges, and hid hinges.
How do I understand which hinge tool I need for my task?
Your option of tools depends on the hinge type and the particular job at hand. Generally, the essentials consist of a screwdriver, chisel, drill, and measuring tape.
Can I change door hinges without expert assistance?
Yes, with the right tools and guidance, most property owners can change door hinges themselves.
How frequently should I lubricate my door hinges?
It is recommended to oil door hinges a minimum of once a year to keep them running efficiently.
What should I do if my door is misaligned after setting up hinges?
If a door is misaligned, inspect the hinge installation, ensure screws are tightened, and adjust the hinge placements if essential.
Understanding the important tools for door hinges assists professionals and DIYers take on installation and maintenance tasks efficiently. Whether it's an easy home repair or an intricate installation, having the right tools at hand is important. By familiarizing oneself with these tools and best practices, people can make sure that all door hinge jobs are successful and long-lasting.
The Comprehensive Guide to Door Hinge Fixers
Door hinges are important parts of any door's functionality. They not only allow doors to swing open and closed smoothly however likewise bear the weight of the door. Over time, however, they can end up being loose, squeaky, or even rusty, leading to issues such as misalignment or trouble in closing the door. This is where door hinge fixers enter into play, using options to restore performance and looks. This article explores the types of door hinge fixers, the process of fixing door hinges, and addresses frequently asked concerns regarding this essential home maintenance topic.

Comprehending Door Hinges and Their Common Issues
Before exploring the numerous options for fixing door hinges, it's essential to understand the types of door hinges and the common problems that can emerge.
Types of Door Hinges
- Butt Hinges: The most common type, utilized for basic doors. They include 2 plates signed up with by a pin.
- Constant Hinges: Also referred to as piano hinges, these run the whole length of the door, supplying additional support.
- Spring Hinges: These hinges automatically close the door after it is opened, frequently utilized in business settings.
- Pocket Hinges: These are used for pocket doors, which move into a wall when opened.
- Pivot Hinges: Allow a door to pivot from a single point, utilized in heavy or big doors.
Common Door Hinge Problems
- Squeaky Hinges: Often brought on by absence of lubrication.
- Loose Hinges: Can result from wear and tear or the wood around the screws becoming removed.
- Rusty Hinges: Common in outside doors or in humid environments.
- Misaligned Hinges: Can cause the door to rub against the frame or not close appropriately.
Table 1: Door Hinge Issues and Solutions
| Concern | Causes | Solution |
|---|---|---|
| Squeaky Hinges | Absence of lubrication | Apply lubricant (WD-40, silicone spray) |
| Loose Hinges | Stripped screws or wood | Change screws or utilize wood filler |
| Rusty Hinges | Exposure to wetness | Tidy rust, apply rust-resistant spray |
| Misaligned Hinges | Use and tear, inappropriate installation | Adjust hinges or reposition door |
The Importance of Using a Door Hinge Fixer
A door hinge fixer is a specific tool or option designed to resolve issues with door hinges efficiently. Depending on the issue, this might include lubes, replacement screws, or tools to realign the hinges.
Advantages of Using a Door Hinge Fixer
- Enhances Door Functionality: Fixing squeaky or misaligned hinges allows for smooth operation of the door.
- Boosts Safety: Properly working hinges ensure that doors close safely, minimizing the threat of injury.
- Extends Longevity: Regular maintenance with door hinge fixers can extend the life of both the hinges and the door itself.
- Aesthetic Appeal: Well-functioning hinges add to the general look of the door.
The Process of Fixing Door Hinges
Fixing door hinges can be a straightforward procedure, depending upon the issue. Here is a detailed guide to resolve typical hinge problems.
Step-by-Step Fixing Techniques
Lubrication:
- Use an appropriate lube like WD-40 or silicone spray.
- Apply straight to the hinge and move the door back and forth to distribute it.
Tightening Up Loose Hinges:
- Use a screwdriver to tighten up existing screws.
- If screws are stripped, change them with longer screws or use wood filler to restore the grip.
Cleaning Rusty Hinges:
- Remove the hinge from the door using a screwdriver.
- Clean the rust with sandpaper or a rust cleaner.
- Use a rust-resistant spray before reinstalling.
Aligning Misaligned Hinges:
- Loosen the screws somewhat without eliminating them.
- Adjust the hinge to the desired position and tighten up screws back.
Replacing Hinges:
- If the hinges are damaged beyond repair, eliminate them from the door.
- Pick new hinges that match the size and type of the old ones.
- Install by lining up the new hinges and securing them with screws.
Table 2: Comprehensive Fixing Guide
| Problem | Fixing Technique |
|---|---|
| Squeaky Hinges | Apply lube |
| Loose Hinges | Tighten up screws or replace with longer screws |
| Rusty Hinges | Tidy with sandpaper and apply rust-resistant spray |
| Misaligned Hinges | Adjust hinge and reposition door |
| Harmed Hinges | Replace with brand-new hinges and install appropriately |
Frequently Asked Questions (FAQs)
1. How frequently should I lube my door hinges?
It is great practice to oil door hinges every six months or as required, especially in high-traffic areas.
2. What kind of lube should I utilize for door hinges?
A silicone spray or a lightweight oil like WD-40 is perfect for lubricating hinges. Prevent using heavy oils which can draw in dust and dirt.
3. Can I fix a removed screw hole in a door?
Yes, you can fix a stripped screw hole by placing a wood dowel or using wood filler. Once dry, re-drill the hole for the screw.
4. How can I tell if my door hinges need replacing?
If the door often squeaks, does not close correctly, or if the hinges show visible damage or rust, it may be time for replacement.
5. Can I utilize household items to clean rusty hinges?
Yes, you can use household items like vinegar or baking soda blended with water to clean light rust, followed by drying and applying a rust-resistant spray.
Door hinge fixers are necessary tools for maintaining the practical integrity of doors in any home or business. By understanding the kinds of hinges, the common issues they face, and the actions associated with repairing them, house owners can guarantee that their doors run efficiently and remain aesthetically pleasing. Routine maintenance is essential to prolonging the life of door hinges, and using proper fixers will eventually result in a safer and more satisfying home. Whether it's an easy lubrication or a complete hinge replacement, keeping the hinges in tip-top shape is a job worth undertaking.
The Purr-fect Fix: A Comprehensive Guide to Cat Door Fixing
As any cat owner can attest, a cat door is a vital function in any feline-friendly home. It supplies our whiskered good friends with the flexibility to come and go as they please, while also keeping unwanted animals out. However, like any other household product, cat doors can end up being broken or worn with time, needing some TLC to get them back in working order. In this post, we'll delve into the world of cat door fixing, exploring the common problems, DIY services, and expert tips to help you keep your feline buddy's entrance in top condition.
Typical Issues with Cat Doors
Before we dive into the fixing part, it's vital to comprehend the common issues that can develop with cat doors. These include:
- Sticking or jamming: Over time, the door's hinges or rollers can end up being worn, triggering the door to stick or jam.
- Leakages: Gaps or cracks in the door or its frame can allow cold air, wetness, or even unwanted visitors to enter your home.
- Broken or damaged frames: Accidental scratches or knocks can harm the door's frame, compromising its structural integrity.
- Malfunctioning locking systems: The locking system can end up being jammed or broken, rendering the door worthless.
- Worn-out seals: The door's seals can become worn out, enabling air to leak through and minimizing the door's energy efficiency.
DIY Solutions for Cat Door Fixing
Luckily, many cat door concerns can be resolved with some fundamental DIY abilities and tools. Here are some step-by-step services for typical issues:
- Sticking or jamming:
- Clean the door's hinges and rollers with a soft brush and some lubricant.
- Use some silicone-based lube to the hinges and rollers.
- If the door still sticks, try adjusting the hinges or changing the rollers.
- Leaks:
- Inspect the door and its frame for spaces or fractures.
- Seal any gaps or cracks with weatherstripping or caulk.
- Change the door's seals if they're worn.
- Broken or harmed frames:
- Clean and check the frame for any damage.
- Use wood glue or a wood filler to repair any fractures or scratches.
- If the frame is seriously harmed, consider changing it.
- Faulty locking mechanisms:
- Inspect the locking system for any obstructions or jamming.
- Clean the locking system with a soft brush and some lubricant.
- If the locking system is still malfunctioning, consider changing it.
- Damaged seals:
- Inspect the seals for any signs of wear or damage.
- Change the seals with brand-new ones, following the producer's directions.
Expert Tips for Cat Door Fixing
While DIY solutions can be efficient, in some cases it's required to contact the experts. Here are some expert tips for cat door fixing:
- Use the right tools: Invest in an excellent quality toolset, including a screwdriver, pliers, and a wrench.
- Step two times, cut as soon as: Before making any repairs, double-check your measurements to avoid any expensive errors.
- Utilize the ideal materials: Choose products that are durable and weather-resistant, such as stainless-steel or PVC.
- Think about upgrading: If your cat door is old or outdated, consider updating to a newer design with enhanced functions and functionality.
Frequently Asked Questions
Q: How typically should I inspect my cat door?A: It's suggested to examine your cat door every 6-12 months to capture any potential issues before they end up being major issues.
Q: Can I fix a cat door myself?A: Yes, numerous cat door problems can be fixed with some basic DIY skills and tools. However, if you're not sure or uneasy with DIY repair work, it's best to speak with a professional.
Q: What are the benefits of upgrading to a more recent cat door model?A: Newer cat door models frequently include improved functions, such as much better insulation, boosted security, and easier cleaning.
Conclusion
Cat door fixing is a relatively simple process that can be achieved with some fundamental DIY skills and tools. By understanding the common concerns that can occur with cat doors and following the expert tips and DIY solutions described in this post, you'll be well on your method to keeping your feline pal's gateway in top condition. Remember to examine your cat door routinely and consider updating to a more recent model if required. With a little TLC, your cat door will continue to provide your feline good friend with the liberty and convenience they deserve.
Additional Resources
- Cat door maintenance list:
- Inspect the door and its frame for any damage or wear.
- Tidy the door's hinges and rollers.
- Inspect the locking system for any obstructions or jamming.
- Change the door's seals if they're used out.
- Advised tools for cat door fixing:
- Screwdriver
- Pliers
- Wrench
- Weatherstripping or caulk
- Wood glue or wood filler
- Cat door makers:
- PetSafe
- Cat Mate
- Staywell
- Perfect Pet Products
By following the tips and guidelines laid out in this post, you'll be well on your method to becoming a cat flap with lock installation (just click the following web site) door fixing expert. Remember to constantly follow security precautions and seek advice from a professional if you're not sure or uneasy with any aspect of the process.

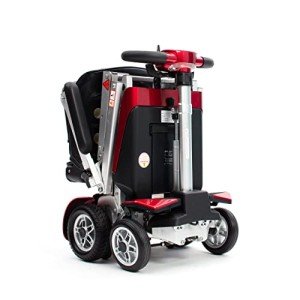
The Versatility of Fold-Up Mobility Scooters: A Detailed Guide
As society continues to embrace inclusivity, developments in mobility help have actually produced innovations that deal with the varied needs of individuals with minimal mobility. Among these tools, fold-up mobility scooters have emerged as an ideal service for numerous individuals looking for self-reliance and freedom of movement. This short article explores the different elements of fold-up mobility scooters, including their advantages, features, and factors to consider for prospective users.
What is a Fold-Up Mobility Scooter?
A fold-up mobility scooter is a compact, portable, and lightweight personal transportation device designed particularly for people who have problem walking. Characterized by their Foldable Mobility Scooter Uk design, these scooters can be quickly transferred in automobiles, buses, and even planes, making them a useful option for users who need a reliable means of mobility both in your home and on the go.
Advantages of Using Fold-Up Mobility Scooters
Fold-up mobility scooters feature numerous benefits, making them a preferred choice for many users. Here is a list of the crucial advantages:
Portability:
- These scooters are designed to be easily folded and unfolded, permitting users to stow them in automobile trunks or closets easily.
Lightweight Design:
- Most fold-up scooters are lightweight, making them more workable for users to steer and carry.
Alleviate of Use:
- With simple controls and instinctive design, these scooters are user-friendly for people of all ages and abilities.
Space-Saving:
- Their foldable function suggests they inhabit minimal space, making them an exceptional alternative for those with minimal storage.
Boosted Mobility:
- Users can experience increased independence and mobility, empowering them to browse various environments with confidence.
Personalized Features:
- Many models provide adjustable seating, armrests, and other personalizable elements to fit different choices and requirements.
Table 1: Comparison of Popular Fold-Up Mobility Scooters
| Design | Weight Capacity | Variety (Miles) | Top Speed (miles per hour) | Folded Dimensions (in) | Price Range |
|---|---|---|---|---|---|
| Pride Go-Go Elite | 300 pounds | 10 | 4.5 | 42 x 21 x 18 | ₤ 1,500 - ₤ 2,000 |
| Drive Medical Scout | 300 pounds | 15 | 4 | 45 x 21 x 18 | ₤ 1,200 - ₤ 1,500 |
| EV Rider Transport | 250 lbs | 10 | 4 | 42 x 23 x 20 | ₤ 1,000 - ₤ 1,400 |
| Invacare Zoome 3 | 300 lbs | 12 | 4.5 | 37 x 21 x 16 | ₤ 1,300 - ₤ 1,700 |
Secret Features to Consider When Choosing a Fold-Up Mobility Scooter
Choosing the best fold-up mobility scooter can considerably impact the overall user experience. Below are some vital features to think about:
Weight Capacity: Ensure that the scooter can accommodate the user's weight for optimum security and performance.
Battery Life and Range: Examine how far the scooter can travel on a single charge and choose one that matches the user's way of life.
Top Speed: Consider the optimum speed of the scooter, especially if the user has mobility needs that require quicker transportation.
Comfort Features: Look for adjustable seats, padded armrests, and ergonomic controls for enhanced convenience throughout use.
Durability and Warranty: Check the building quality and available service warranty alternatives to guarantee long-term complete satisfaction and security.
Maintenance Tips for Fold-Up Mobility Scooters
Correct maintenance is crucial to ensure durability and performance for fold-up mobility scooters. Users ought to abide by the following ideas:
Regular Cleaning:
- Keep the scooter clean from dirt and particles to prevent wear and tear on its parts.
Battery Management:
- Charge the battery fully eventually journeys and regularly inspect for any signs of damage or wear.
Tire Maintenance:
- Inspect tires for appropriate inflation and tread wear. Replace tires when needed to guarantee smooth trips.
Service Checks:
- Schedule regular expert servicing to identify possible issues before they become issues.
Regularly Asked Questions (FAQs)
How much do fold-up mobility scooters typically weigh?
- A lot of fold-up mobility scooters weigh between 50 and 120 pounds, with varying weight capacities depending upon the model.
Are fold-up mobility scooters ideal for outside use?
- Yes, lots of designs are developed for outside usage, including resilient tires and stronger frames that can deal with rougher surfaces.
Can fold-up mobility scooters fit into the trunk of a cars and truck?
- Many fold-up designs can be quickly dismantled or folded to suit the trunk of most standard-sized automobiles.
Do I require a chauffeur's license to operate a mobility scooter?
- Normally, no motorist's license is required to run a mobility scooter; however, local laws might vary.
For how long does the battery last on a fold-up mobility scooter?
- Battery life can vary depending upon the design and use however usually lasts in between 10 to 15 miles on a single charge.
Fold-up mobility scooters have reshaped the landscape of personal mobility aids, offering people the freedom to explore their environments separately and confidently. With their portability, ease of usage, and customizable functions, these scooters work as indispensable tools for people dealing with mobility obstacles. Possible users must thoroughly consider their particular requirements and preferences while picking a design to guarantee they attain the best possible experience. With appropriate upkeep, a fold-up mobility scooter can greatly boost the quality of life for its users, paving the way for a more active and fulfilling way of life.


Commercial Window Repair: A Comprehensive Guide
Industrial structures, from dynamic retail spaces to business workplaces, rely greatly on their windows for aesthetic appeal, energy performance, and overall functionality. With time, nevertheless, windows can experience wear and tear, resulting in concerns that require expert repair. This post looks into the world of business window repair, checking out typical concerns, the value of timely maintenance, and the advantages of hiring an expert service.
Understanding Commercial Windows
Industrial windows are designed to endure the rigors of high traffic and differing weather conditions. They are usually larger and more robust than residential windows, typically featuring specific products and finishes to boost durability and energy effectiveness. These windows can be made from different products, consisting of aluminum, steel, and composite materials, each with its own set of benefits and upkeep requirements.
Common Issues with Commercial Windows
- Broken or Broken Glass: One of the most common concerns, particularly in high-traffic locations, is broken or broken glass. This can be triggered by unexpected effects, severe weather condition, or even thermal tension.
- Seal Failure: Over time, the seals that keep the window panes airtight can weaken, leading to drafts, moisture infiltration, and increased energy costs.
- Hardware Malfunction: Locks, hinges, and other hardware can wear or end up being misaligned, making it tough to open or close windows effectively.
- Frame Damage: The frames of business windows can warp, rot, or corrode, especially in environments with high humidity or direct exposure to the aspects.
- Condensation: Excessive condensation in between the panes of double-glazed windows can decrease presence and indicate a failed seal.
- Energy Inefficiency: Older windows may not meet current energy efficiency requirements, resulting in greater heating and cooling expenses.
The Importance of Timely Maintenance
Routine upkeep is important for the durability and performance of commercial windows. Neglecting these jobs can lead to more significant and expensive repairs down the line. Here are some crucial upkeep practices:
- Inspection: Regularly inspect windows for signs of damage, such as cracks, loose seals, and worn hardware.
- Cleaning: Clean windows and frames to remove dust, dirt, and debris that can accumulate and trigger damage.
- Lubrication: Lubricate moving parts to ensure smooth operation and avoid wear.
- Seal Replacement: Replace harmed or weakened seals to keep airtightness and energy efficiency.
- Professional Inspections: Schedule routine expert examinations to catch issues early and avoid them from escalating.
Advantages of Professional Commercial Window Repair
While some small issues can be attended to in-house, more complicated issues frequently need the knowledge of a professional commercial window repair service. Here are some benefits of working with a professional:
- Expertise: Professional Repair Timber Windows professionals have the knowledge and experience to detect and repair a large range of window concerns.
- Quality Materials: They use premium products and parts that fulfill market standards, making sure a lasting repair.
- Service warranty: Many expert services provide warranties on their work, providing peace of mind and protection against future problems.
- Time and Cost Savings: Addressing problems promptly can prevent them from becoming more extreme, conserving time and cash in the long run.
- Security: Professional technicians follow safety protocols to ensure the work is done securely and without threat to building residents.
The Process of Commercial Window Repair
The process of commercial window repair generally involves several actions:
- Assessment: A professional specialist will inspect the windows to identify the specific concerns and identify the finest course of action.
- Quote: Based on the evaluation, the service technician will supply a comprehensive quotation for the repair.
- Scheduling: Once the quote is approved, the repair work is set up at a time that lessens disruption to the organization.
- Preparation: The area around the windows is prepared to protect the surrounding surface areas and guarantee a clean work environment.
- Repair: The specialist will perform the required repairs, which might consist of replacement of glass, seals, hardware, or frames.
- Evaluating: After the repair, the professional will check the windows to ensure they function appropriately and satisfy all safety and performance standards.
- Cleanup: The workspace is cleaned up, and any debris is eliminated.
- Final Inspection: A last evaluation is carried out to make sure the repair satisfies the customer's satisfaction.
FAQs About Commercial Window Repair
What are the indications that my commercial windows require repair?
- Broken or broken glass
- Drafts or air leaks
- Problem opening or closing windows
- Visible damage to frames or hardware
- Extreme condensation between panes
How often should business windows be checked?
- It is advised to inspect industrial windows a minimum of once a year, with more regular assessments in high-traffic or severe environments.
Can I repair business windows myself?
- Small problems, such as cleaning and lubrication, can typically be handled in-house. Nevertheless, more intricate repairs must be delegated professionals to guarantee safety and quality.
How much does industrial window repair expense?
- The cost can differ widely depending upon the level of the damage and the kind of windows. Basic repairs, such as changing a seal, may cost a few hundred dollars, while more substantial repairs, like replacing a frame, can cost several thousand dollars.
What should I look for when picking a commercial window repair service?
- Look for a service with a great credibility, experienced service technicians, and a track record of quality work. Look for reviews, accreditations, and guarantees on their services.
The length of time does business window repair take?
- The duration can differ depending upon the intricacy of the repair. Easy repairs might be finished in a couple of hours, while more extensive tasks can take a day or more.
Commercial windows are a vital element of any structure, affecting its appearance, energy efficiency, and general functionality. Regular upkeep and prompt repairs are vital to guarantee these windows continue to carry out at their finest. By understanding typical problems, the value of upkeep, and the benefits of expert repair, entrepreneur can make educated choices that safeguard their financial investment and improve the comfort and safety of their areas.
Whether it's a little crack in the glass or a more substantial problem with the frame, attending to window issues quickly can save time, money, and trouble. For the very best results, consider partnering with a credible commercial window repair service that can offer the know-how and quality work required to keep your windows in leading condition.